|
1/26/2021 0 Comments Layers of the EarthBy Swara Repala and Sanjana Kambhamettu
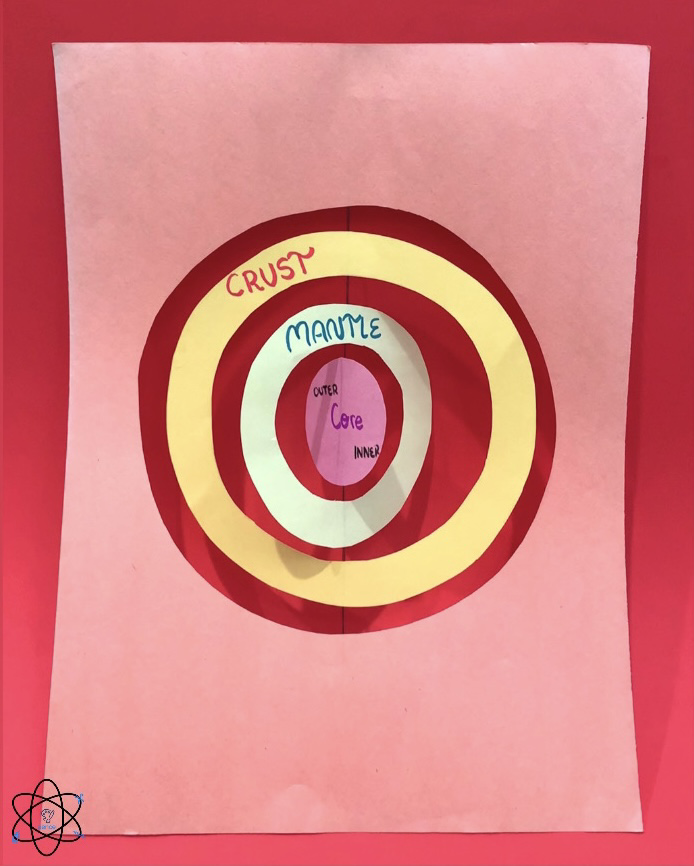
In this session, we will be making a craft that displays the layers of the earth. We will be discussing each layer of the Earth, and going into depth about the differences between each and their special characteristics. We will be focusing on the crust, mantle, and the inner and outer core, as well as the continental and oceanic crust, lithosphere, and asthenosphere. The recommended age group for this project is 4 to 10 years old, although all ages are welcome!
Materials Needed:
- 1 sheet of paper (can have more for color variety)
- String/yarn/ribbon - Tape or glue - Scissors - Optional: Writing Utensils HOW TO
Step 1: Take a piece of paper, and cut a large circle in the middle of it, going from end to end. You can use a circular object to assist you.
Step 2: Take the circle you cut from the paper, and use that to cut out a large ring. Cut two more rings from that same paper so that they fit inside each other. You need to have 3(optionally 4) rings total. Step 3: Tape a sting down the middle of the paper, and tape the rings onto it, in size order. Step 4: Label the rings with the names of the layers. Step 5: Hold up you paper, and watch the layers spin! The Lesson
Throughout the course of this session, we will be discussing the layers of the earth. We will be exploring characteristics such as what each layer is made up of, the size, and more. This is an interactive activity depicting the layers of the earth, and encourages hands on-learning. It therefore ensures a deeper understanding, and helps foster interest of the topic in children. You can find our science lesson and craft explanations in the presentation below!
0 Comments
1/18/2021 0 Comments Groundhog Day Activityby vishista chittalooru and swara repala
In this session, we will be creating a stimulating craft, modeling the essence of Groundhog Day, exploring the concepts of shadows and their relation to the prediction of seasonal changes - in this case the arrival of Spring! We will also be learning about why seasons occur, and how we can generally predict the arrival of seasons. The recommended age group for this project is 4 to 10 years old, although all ages are welcome!
Materials needed:
- Paper plate
- Toilet paper roll or some type of roll of cardboard (must be around the size of a toilet paper roll) - Sheet of paper OR you can print out our template below! - Straw - Tape and/or glue - Scissors - Pencil Optional: Coloring materials (we find that paint is the best way to color your plate if you so choose!) AND our template down below! how to
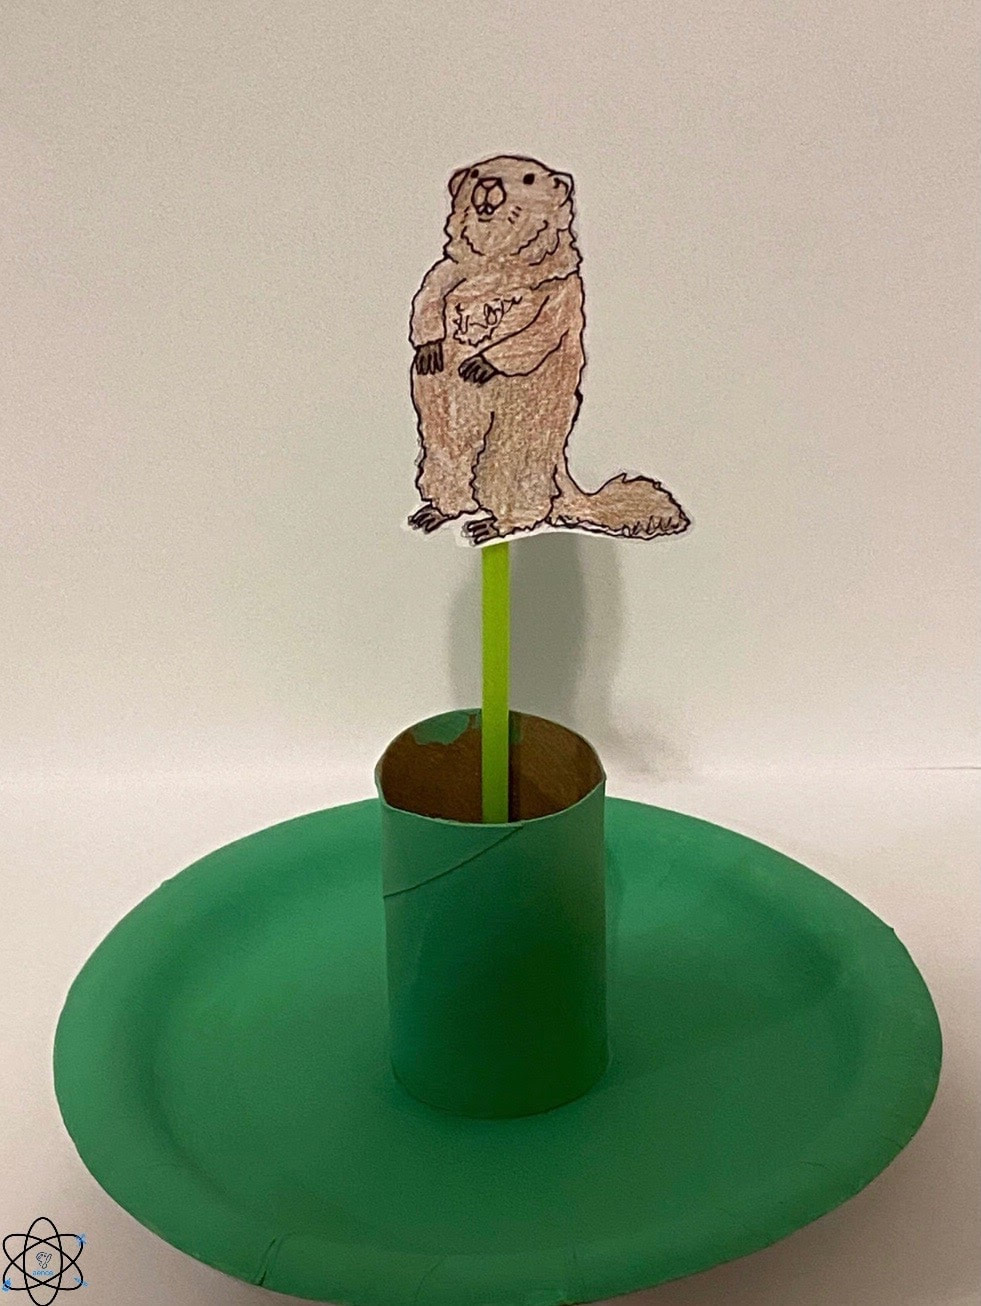
Step 1: Draw a small groundhog on you paper. Make it however you choose, but it should fit in your toilet paper or cardboard roll!
Optional: OR you can print out our groundhog template below! Optional Step 2: Color your groundhog. Step 3: Cut out your groundhog. Step 4: Tape you groundhog to the top of your straw. Optional Step 5: Decorate your plate (we find that paint is the best way to color your plate if you so choose!) Step 6: Cut a small X in the center of your plate. Optional Step 7: Color/decorate your toilet paper/cardboard roll Step 8: Glue your toilet paper or cardboard roll in the center of your plate. The X we cut should be in the center of the toilet paper/cardboard roll. Step 9: Place your straw through the toilet paper roll until you cannot see the groundhog anymore. Step 10: Push the groundhog up near light and you can see its shadow! Push it away from light and you cannot see its shadow! the lesson
In this lesson we will be learning about the North American celebration of Groundhog Day, and its significance in predicting the changing and arrival of seasons. We will be understanding the science behind the holiday, and why Punxsutawney Phil (and other groundhogs) does or does not see his shadow, affecting his prediction of the early of late arrival of spring. In addition we will be learning about the actual cause for the seasons, going into detail about various phenomena such as the Earth's tilt, revolutions and their influence over the seasons, and solstices and equinoxes. By the end of the lesson through the hands on creation of the craft, your child will understand the concepts behind the changes of seasons. You can find our detailed science lesson and craft explanations in the presentation below!
1/11/2021 0 Comments Zones of the OceanBy Sanjana Kambhammmettu and Vishista Chittalooru
In this session, we will be creating a craft that shows the zones of the ocean! This activity focuses on the differences in each of the 5 zones, and shows that through the sliding craft. In addition to this, we will be discussing topics such as the 5 oceans that make up most of the planet, and marine life. The recommended age group for this project is 4 to 10 years old, although all ages are welcome!
Materials Needed:
- Paper plate
- Pencil/pen/popsicle stick - Sheet of paper - Scissors - Glue/tape - Optional: Decorative materials How to
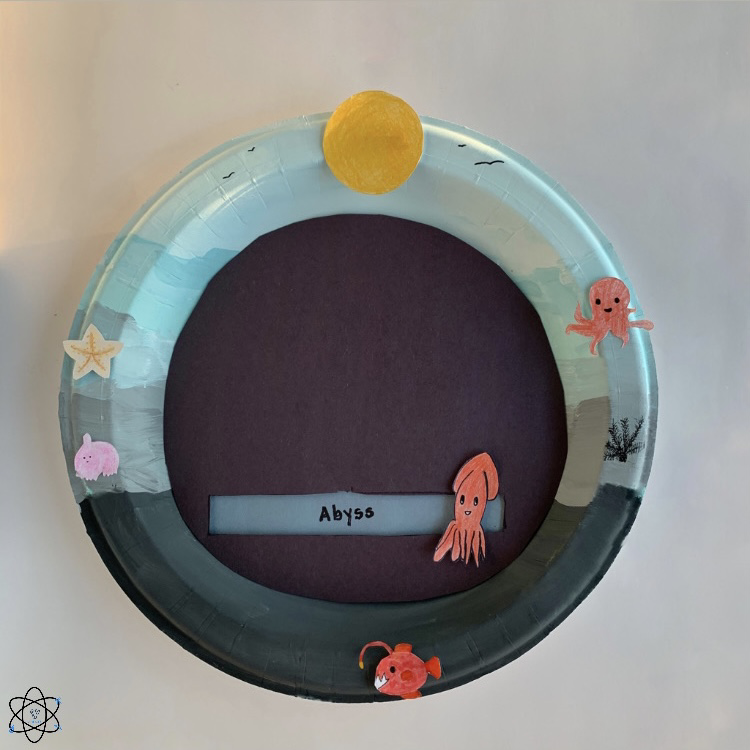
Step 1: Cut a slit on the right side of the inside of the plate, about 3 inches long.
Step 2: Draw 5 sections on the plate, going down in a row, and increasing in depth as it goes lower. This will show all the zones of the oceans, which is outlined in more detail in the presentation below. Optional Step: Decorate your background however you would like. Step 3: Cut a rectangular strip of paper that will cover all the zones except one. Step 4: Slide your pencil/popsicle stick into the slit from behind. This will be your slider. Step 5: Glue or tape the right middle of your strip of paper to one end of the slider. Step 6: Slide up and down to see the zones of the ocean! The lesson
Throughout this session, we will be explaining aquatic ecosystems. We will be exploring concepts related to the great mystery of the underworld by learning more about aquitic life, and the depths of the 5 oceans. This hands-on activity that demonstrates the 5 zones, and ensures that the children will be innovative and deepen their knowledge on this. You can find our science lesson and craft explanations in the presentation below!
1/5/2021 0 Comments HatologyBy Sanjana KAMBHAMMETTU and Swara Repala
In this session, we will be creating an interactive game, which can easily be modified by your child's imagination! Putting a fun twist on the objective of this game, we have decided to call it Hatology. It is very easy to add your own spin to this game, and we strongly encourage your child to do so. The object of the game will be to get the hat onto the person, and it can be played with multiple people to see who can do it the fastest. We will be discussing topics related to energy, and forces and motion. Our recommended age group for this activity is 4-10 years old, as always, although all ages are welcome!
MATERIALS NEEDED:
- An empty paper towel roll (can use two toilet paper rolls instead)
- 1-2 sheets of paper - Pencil to draw with - Pencil/pen/popsicle stick to tape your ribbon to - Scissors - Glue stick/tape - Thread/yarn/ribbon - Mini disposible cup that will fit on top of the cardboard paper roll - Optional: Coloring materials, decorative materials. HOW TO
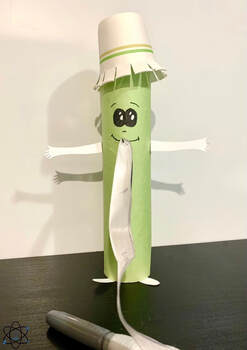
Step 1: Take your paper towel roll or 2 toilet paper rolls(tape them together), and decorate with paper and other accessories if you would like to do so.
Step 2: Cut a small slit or poke a hole in the top middle of the roll, using a pencil or a pair of scissors. Step 3: Pull the ribbon, thread, yarn, or other material through the slit/hole and up the top of the roll(s), out the other end, making sure that there is plenty of it left on both sides. Step 4: Cut 1/2 inch lines into the rim of your disposable cup, about 1/2 inch apart. This will create a fringe around the edge. Step 5: Glue or tape the other end of the ribbon(the side that you have pulled through) to the inside bottom of the cup. Step 6: Optionally, you can decorate the person that you have now created by giving them arms, legs, and/or a face. Step 7: Play your game through the use of force and motion! Pull the cup towards you to place on top of your person as a hat. We recommend that you make more than one, so you can compete with family and friends! The Lesson
While creating this DIY game, we will be learning about many topics that are related to both energy, and forces and motion. We will specifically cover acceleration, action, reaction, types of energy, and their examples. When the children connect these ideas to their craft, it allows for a more in depth understanding of it due to the hands-on activity. This will especially be enhanced if they make their own modifications to the game. You can find our science presentation with more thorough explanations below!
1/4/2021 0 Comments happy new year!5..4..2..3..2..1… Happy New Year! We find ourselves at the start of another year, baffled at how time flew so fast and tired from the festivities of the holiday season. Though it looked different this year, one could argue it held more magic than years past. Despite the regretful circumstances, being forced to stay home created the opportunity for many families to spend more time with each other, and to enjoy the holidays together. Many had safe small gatherings with their families and spent time with select friends. For one, I spent my Christmas watching Home Alone by the fireplace with my family, drinking hot cocoa, and listening to Christmas music. The holiday I most enjoyed, though, I’d have to say, is New Year’s Eve. There’s a special kind of hope, of magic that arrives before New Years. The feeling that we can start fresh, create new goals, and start the year out right to achieve them. Even if you hadn’t followed through on any of last year’s resolutions, most find themselves writing new ones. Coupled with counting down ‘til midnight and fireworks, what could make a night more magical?
Fireworks, the beautiful displays of light we enjoy, have been around for hundreds of years, originating in China. They’re created by putting gunpowder or flash powder in tight paper tubes with a fuse to light the powder. The chemicals in the components, such as charcoal, sulfur, and potassium nitrate, react with one another, resulting in the explosion we all know and love. To create bright, shimmering sparks, it’s also common for fireworks to contain aluminum, iron, zinc, or magnesium dust. The metal flakes heat up until they’re bright and glowing, or at a high enough temperature, burn. And to add some pop of color to your light show, a variety of chemicals can be added to make fireworks red, green, purple, yellow, or any other color you want! “But how do fireworks create specific patterns/shapes in the sky?” you may be wondering. A firework is generally formed like a shell with four parts: the container, stars, bursting charge, and fuse. The container is usually pasted paper and string formed into a cylinder shape, with the stars inside, which are spheres, cubes, or cylinders, containing powder. Kind of funny how the stars aren’t shaped like stars, right? The bursting charge is located in the center of the shell, and is a mixture needed for the firework to explode once it’s reached its desired height. Lastly, the fuse provides a time delay so that the shell can reach the right height. These four components work in tandem to create the usual firework shape- sparks extending outward from the center point. To make specific shapes, technicians first have to outline the figure they want with stars. They then surround the stars with a layer of break charge (a mixture similar to burst charge) to separate them from the rest of the shell’s contents and place explosive charges inside to blow them outward into a large figure. And now you know! You understand the magic of fireworks. The display of lights we enjoy during the holidays, as fleeting as they are, aren’t just beautiful explosions in the sky. They are complex devices and take a considerable amount of time to create, not to mention actually coordinating and choreographing an intricate firework show is said to take hours! So next time you see fireworks or a firework show on New Year’s Eve, those random nights people decide to ignite fireworks, or any other night, appreciate the time it took to create them. And make sure to remember the secret of how they come to be! |
|||||||||||
