|
6/19/2021 0 Comments volcano activityvishista chittalooru
In this session, we will be creating a mini erupting volcano to model the inner workings of volcanoes in real life. Throughout this activity, we will be learning about the makeup of volcanoes, where they’re found, and what causes eruptions. In addition, we will examine the different kinds of volcanoes, the characteristics that differentiate them, and more!
materials needed:
- Plastic cup or bowl
- Water - 3-4 tbs of baking soda - 1 tsp of dish soap - 1 cup of vinegar to start with per eruption - 1-2 ziplocks - Paper towel/ table covering - Paper - Scissors - Pencil/pen - Tape/glue Optional: Food coloring or paint, measuring cups/tools, and coloring materials! how to
Step 1. Make sure your surrounding are covered so they don't get dirty by the volcano!
Step 2. Put the water inside of a plastic cup/bowl. Fill it about 2/3 full. Step 3. Add 3-4 tbs baking soda, 1 tsp dish soap, and little washable paint (if you have it) to your cup/bowl. Step 4. Mix these ingredients well. Step 5. Curve your paper around your cup/bowl to create a cone shape (there should be a circular entrance at the top). Step 6. Depending on the size of your cup/bowl cut about 1/2 - 3/4 of the paper to use OR use the entire thing. Step 7. This paper is going to the outside of our volcano. Step 8. If you would like to, decorate the paper to resemble a volcano. Step 9. The size of your paper will determine how many ziplocks you use for this step. Cut the zipper part off of 1-2 ziplocks. Step 10. Use this plastic to line the inside of your paper so it doesn't get soggy during the eruption. Step 11. Tape the plastic to the paper, and then tape the entire paper around your cup/bowl. Step 12. Add 1 cup of vinegar through the opening at the top of your volcano, and watch it erupt! Have fun with it and add more if you want to! The lesson
In this session of our Summer Camp, we are learning about all about volcanoes! We will be discussing what volcanoes are, diving into how they are formed and the different kinds of each volcano. We will also be examining the different classifications of the status of volcanoes, what magma is, and the structure of volcanoes, in addition to summarizing plate tectonics, and its relation to volcanoes and their formation. To enrich this learning, we will be making our very own volcano through materials found through your home! The creation and eruption of our own volcano will deepen the children's understanding of volcanoes overall, and build creative connections to the information presented. You can find our science concepts and craft explanations in the presentation below!
0 Comments
5/25/2021 0 Comments Oobleck ActivityBy Swara Repala
The next topic that we will be covering in our Summer Camp is matter! We will discuss the states of matter and their characteristics, as well as how they can go through physical changes such as sublimation, condensation, evaporation, freezing, boiling, and melting. We will be creating a slime-like substance, which is in a liquid state but becomes solid when touched.
MATERIALS NEEDED:
- 1 bowl
- 1 spoon - 1/2 cup of cornstarch - 1/4 cup water HOW TO
Step 1: In a bowl, add 1/2 cup of cornstarch.
Step 2: Slowly start mixing the water into the cornstarch. Add a little bit at a time to make sure it does not become too runny. Step 3: Now take the oobleck into your hands and feel it solidify, and change between the states of matter. THE LESSON
In this lesson of our Summer Camp, we will be learning about the different states of matter and their characteristics. We will go into depth of how they can go through physical changes such as sublimation, condensation, evaporation, freezing, boiling, and melting. We will be creating oobleck which is a slime-like substance, which is in a liquid state but becomes solid when touched. This practical application of seeing the states of matter change helps children combine creativity with their thinking skills. You can find our science concepts and craft explanations in the presentation below!
5/25/2021 0 Comments Brain Model Activity
By Sanjana Kambhammettu
In this section, we will be forming playdough from scratch in order to make a 3-D human brain model. We will be discussing the different parts of the brain and their functions throughout the session, and associating them with the area of the mind depicted in our hand-held creations.
Materials Needed:
- Flour
- Water - 1 bowl - 1 cup - 1 spoon/mixing utensil - Salt - Oil - Food coloring/paint/any natural dyes Note: The ingredients above are for the creation of no-cook playdough. If you would like to use store bought clay instead, you will not need the given supplies. - Optional: Air tight container or ziplock bag for storage afterwards. Clay molding tools (your hands work perfectly for this, too!) How To
To create the playdough:
Step 1: Add the flour and salt in the bowl, and mix together. Step 2: Mix together the oil and food coloring in a cup. Step 3: Add hot water to the cup, and mix until the food coloring is completely dissolved (the darker your mixture, the more vibrant your dough will be). Step 4: Pour the liquid mixture into the dry mixture, and stir until it reaches a dough consistency. Step 5: Making sure your dough has cooled, lay it out on a floured surface and knead until it is no longer sticky. To create the brain model: Step 1: Following the structure of a human brain, break apart your clay and mold into the parts. If you would like, create a different colored dough for each section of the brain. Step 2: Piece these together, and smooth them out. Step 3: Add any details, such as meninges, with the use of your hands and molding tools. Step 4: Enjoy your very own concocted 3-D brain model! The Lesson
In this science lesson, we will be using our own three-dimensional diagrams of a human brain to understand how specific parts of the brain relate to each role that it has, and how that section carries out its part through the use of different body systems. We will also discuss how your brain perceives the information that it receives through your senses, and how it directs that for different situations. For example, if you place your hand near a hot stove, your brain and nerves work together to send signals that result in you identifying the heat and pulling your arm away, all in a matter of seconds!
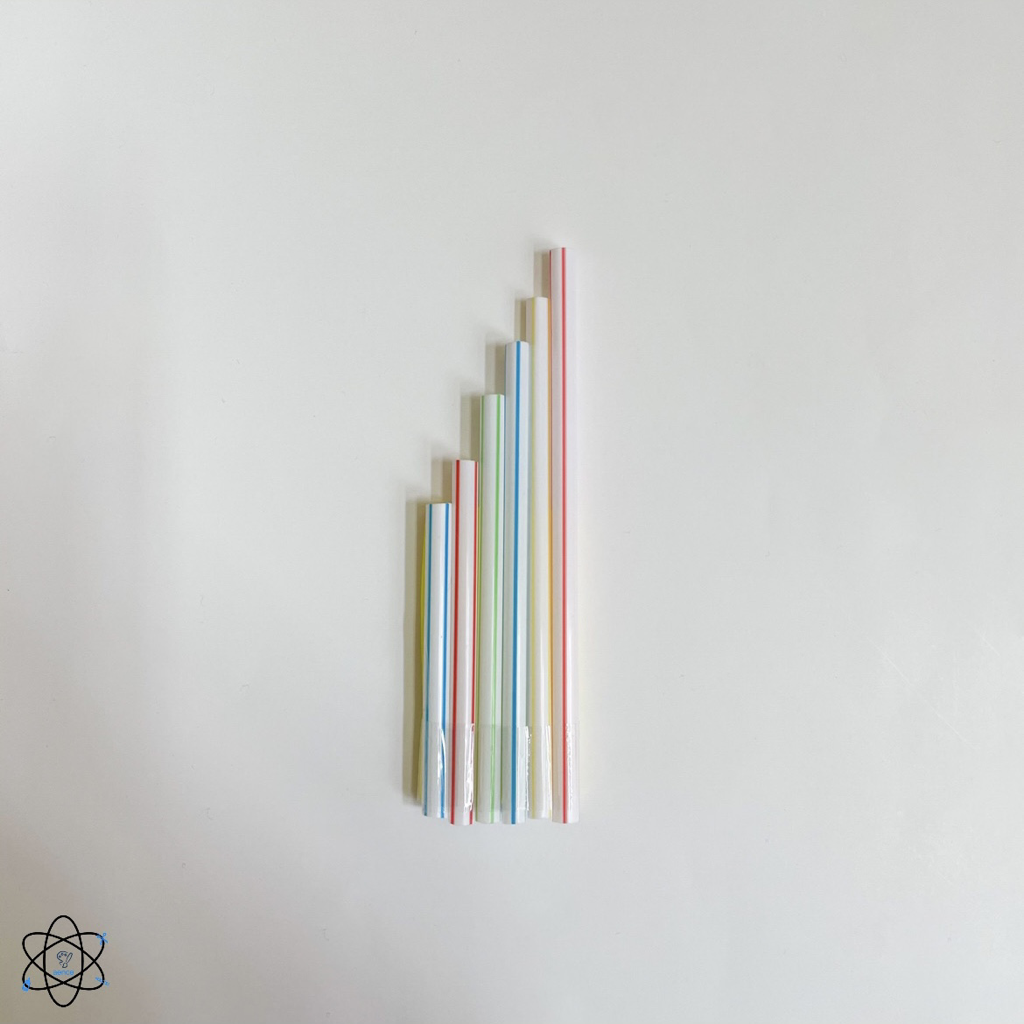
5/11/2021 0 Comments Pan Flute ActivitySanjana Kambhammettu and Vishista Chittalooru
In this lesson, we will be learning about sound frequencies and waves, and how differences in the length of the straws used in this lesson will affect pitch. This flute can be "played" and is fully functioning in the way that blowing in different combinations of straws produces different sounds. All ages are welcome!
Materials Needed:
- 4-6 Straws
- Tape - Scissors - Optional Materials: Ruler How to
Step 1: Lay all your straws down on a flat surface, aligning them.
Step 2: Leave the first straw alone, and cut 1/2 inch off the top of the second straw. Step 3: Cut an additional 1/2 inch after each straw (example: 3rd straw-cut 1 inch off, 4th straw- cut off 1.5 inches). Once finished with all the pieces, they will look like stairs or stepping stones diagonally, from longest to shortest, using your ruler to make sure they are aligned. Step 4: Tape the straws together securely, using several pieces if necessary. Step 5: Blow into your flute from the flat side, and listen for which sounds have the highest and lowest pitches! The Lesson
In this lesson, we will be learning about the basics topics of frequency, vibrations, and waves. This practical application of how terms like pitch applies to their own musical instrument ensures the retention of information that have been discussed, and pushes children to combine creativity with their critical thinking. You can find our science concepts and craft explanations in the presentation below!
BY SWARA REPALA AND SANJANA KAMBHAMMETTu
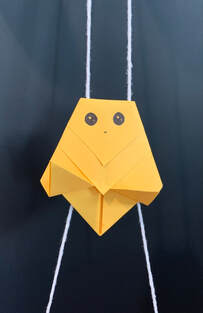
In this session, we will be learning how to make a climbing bird interactive activity, to learn about how animals adapt to their environment, as well as migration. This bird will 'fly', and climb up the threads. The recommended age group for this project is 4-10 years old, although all ages are welcome!
MATERIALS NEEDED:
- Paper
- 2 feet of string or yarn - Tape/glue - Scissiors - Optional: Coloring/decorative materials HOW TO
Step 1: Starting out with a rectangular sheet of paper, fold it diagonally into a triangle.
Step 2: Open it up, and fold the other side diagonally as well. Step 3: Having the flat side on the bottom, fold the two sides of the triangle up to the top corner, creating a diamond. Step 4: Pull the corners of the diamond back, and crease it about halfway. Step 5: With the two layers of paper that are left on top, fold them down as well, leaving about an inch in between the two. Step 6: Flip your bird over. Set this to the side, and fold your string in half, with a loop at the top. Step 7: On the bird, bring the edges together, and slide the string through. Use glue/tape to secure. Step 8: Attach the loop of your strings somewhere up high, and watch the bird fly when you pull at the bottoms! THE LESSON
In this lesson, we will be learning about migration and other adaptations patterns. We will be looking at the 3 types of adaptations that are observed in animals and why they happen, along with the reasons behind migration happening. This hands on activity of creating the climbing bird ensures that the children will retain all of the content they have learned. It further deepens their creativity and critical thinking skills, which pushes them to make more real world connections. Find our science lesson and craft explanations in the presentation below!
vishista chittalooru and swara repala
In this activity we will be focusing on physical and chemical changes, diving deep into what they are and what their properties are. We will also be talking about combustion and its relation to fire. Additionally, we will be creating an interactive craft to demonstrate the movement of fire!
materials needed:
- Ziplock or sheet protector
- 3 sheets of paper - Tape - Scissors - Pencil Optional: Coloring materials and construction paper (red and/or orange) how to
Step 1. In the center, draw a shape of a fire on two sheets of paper.
Step 2. Cut the fire shape out! Your papers should now have a fire shaped hole in the center. Step 3. Attach the paper to both sides of your sheet protector or Ziplock bag. Step 4. Cut out small rectangular pieces of paper (out of your white paper or colored construction paper). This will be your fire! Step 5. Put your fire pieces into your Ziplock or sheet protector. Step 6. Seal your sheet protector/Ziplock bag with tape. Step 7. Shake your sheet protector/Ziplock bag, and watch your fire move! the lesson
In this session, we will be discussing chemistry, specifically chemical and physical changes. We will be learning about their respective properties, and other chemical reactions, such as combustion and how it relates to fire. To deepen our understanding of these concepts we will be creating an interactive model of fire! This hands-on recognition and understanding ensures that the child will comprehend the science concept thoroughly. You can find out more detailed science lesson and craft explanations in the presentation below!
4/20/2021 0 Comments Hot Air BalloonSanjana Kambhammettu and Vishista Chittalooru
In this session, we will be creating a flying hot air balloon to learn about the wonders of this type of aircraft and how it works. We will discuss the topics related to the circulation of air that is needed for flight, such as heat, volume, density, and convection! We will also be playing a Kahoot in our live class! Our recommended age group for this craft is 4 to 10 years old, although all ages are welcome!
Materials Needed:
- 3 sheets of paper
- Toilet Paper Roll - Paper plate - String - Tape - Scissors - Optional: Coloring materials How To
Step 1. Trace a hot air balloon shape onto your paper.
Step 2. Repeat this 4 more times. You should have 5 hot air balloon shapes now! Step 3. Cut the hot air balloons out our your paper. Optional: Decorate your hot air balloon shapes! Step 4. Fold each hot air balloon in half. Step 5. Attach the folded pieces together, forming an something that looks like an accordian. Step 6. Attach the remaining 2 sides needed to connect the entire hot air balloon. Step 7. Create a small hole at the top of your hot air balloon. Step 8. Thread some string through the hole and create a loop (so you can hold the hot air balloon easily). Step 9. Cut out a rectangle approx. 3.5 inches by 1.5 inches- using a paper plate. Step 10. Connect the ends of the rectangle together to create a circular ring. Step 11. Cut out 4 small strings, approx 0.5 inches, and attach them to the cardboard ring with tape. Step 12. Attach the remaining end of the strings to the end of the hot air balloon! The Lesson
In this lesson, we will be discussing air flight, with the use of the hot air balloon as a real life example. It covers the explanation of how density and convection combine to have an impact on the molecules in the hot air balloon, and causes it to rise! This hands-on style of learning ensures the development of understanding of this topic and allows children to connect to how flight works in real life. You can find the science explanations and a picture of the craft below!
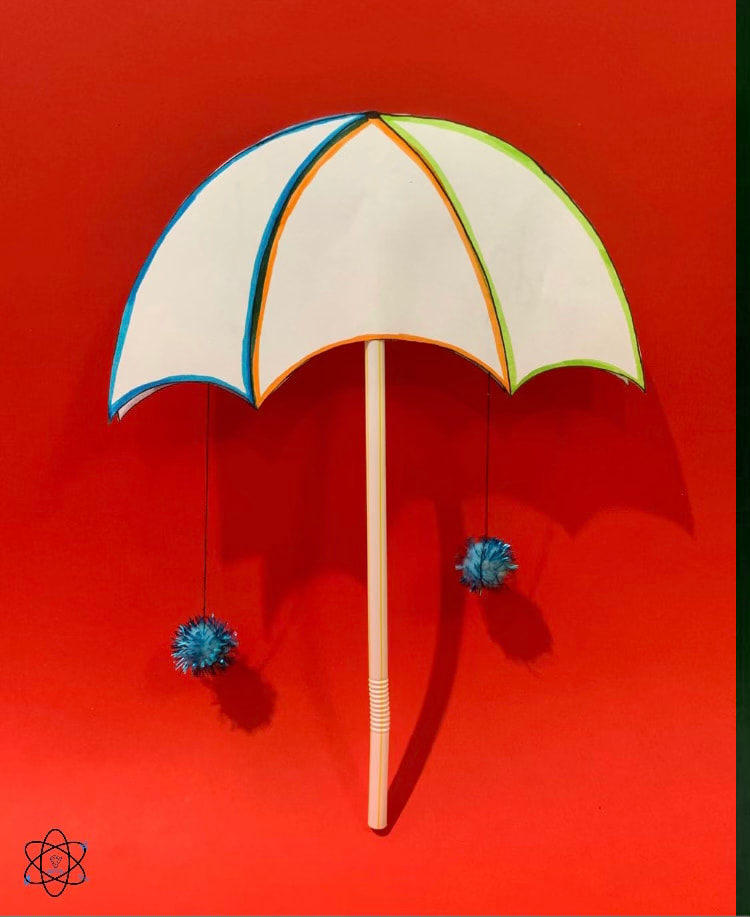
4/13/2021 0 Comments Umbrella WEATHER ActivityBy Swara Repala And Sanjana KAMBHAMMETTU
In this session, we will be creating a spinning umbrella to demonstrate different types of weather, as well as playing a Kahoot! While we create the craft, we will be discussing the topics of weather, precipitation, and more! Our recommended age group for this project is 4 to 10 years old, although all ages are welcome!
MAterials Needed:
- 1 straw/pencil/utensil
- A sheet of paper or a print out of our umbrella template - String/thread/anything attachable - Tape - Scissors - Little trinkets such as pom-poms, beads, coins, etc - Optional: Coloring materials How To
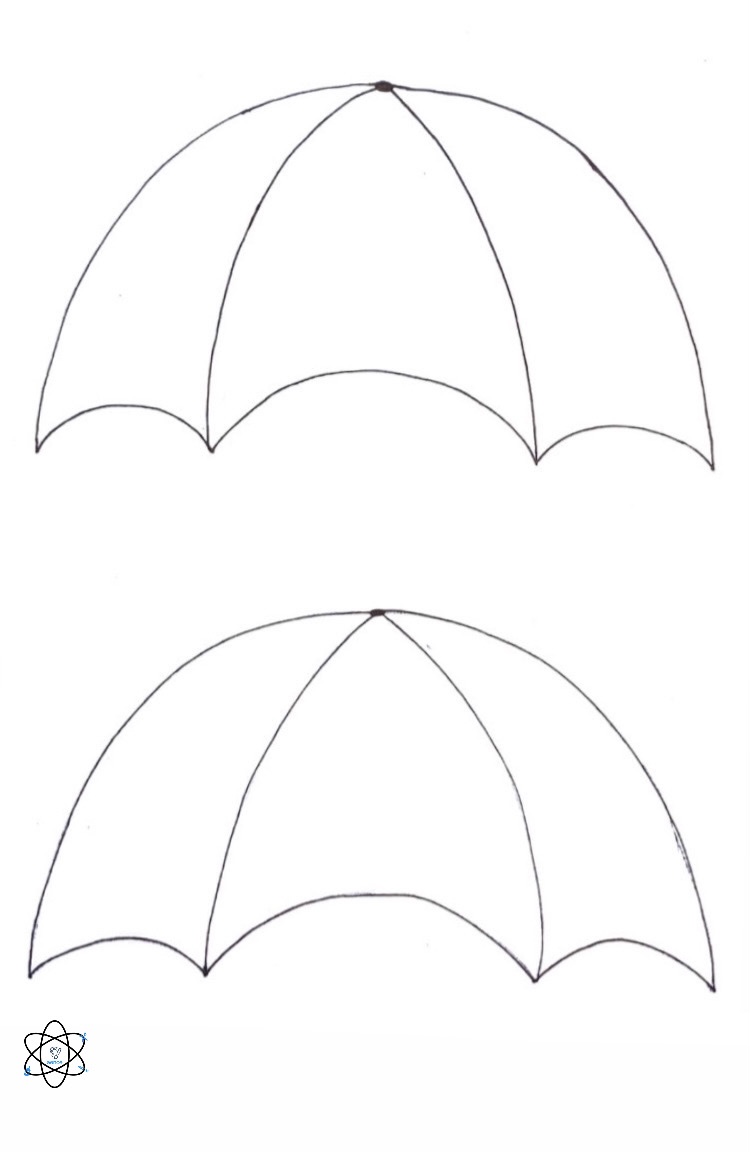
Step 1: Draw and cut out 2 copies of an umbrella canopy. You can use the template below as reference for your drawings or to print and cut for your own diagram!
Optional Step: Color and decorate your canopies if you would like to do so! Step 2: Tape your straw to the center of the backside of one of the canopies. Step 3: Tape the other canopy to the straw, right side up. Step 4: Cut out 2+ lengths of string(You can have as many of these you would like, accomodating your craft size), roughly 3/4 the length of your straw. Step 5: Securely tie/tape your string to your trinkets. These represent different types of precipiation. Step 6: Tape these attachments on opposite sides of your canopies, on both sides, evenly. Step 7: Spin your toy and see your weather umbrella wind away! The Lesson
In this lesson, will be learning about the topic of weather, types of precipitation such as rain, snow, sleet, and hail, and factors that influcence weather. We will cover the different factors (temperature, latitude, elevation & air pressure, and the water cycle), as well as how they individually affect weather. The combination of both the hands on activity and the competitive game in this craft fosters a creative thinking mindset in the children. The act of both connecting and applying the knowledge makes it highly likely that the information learned in class will be absorbed.
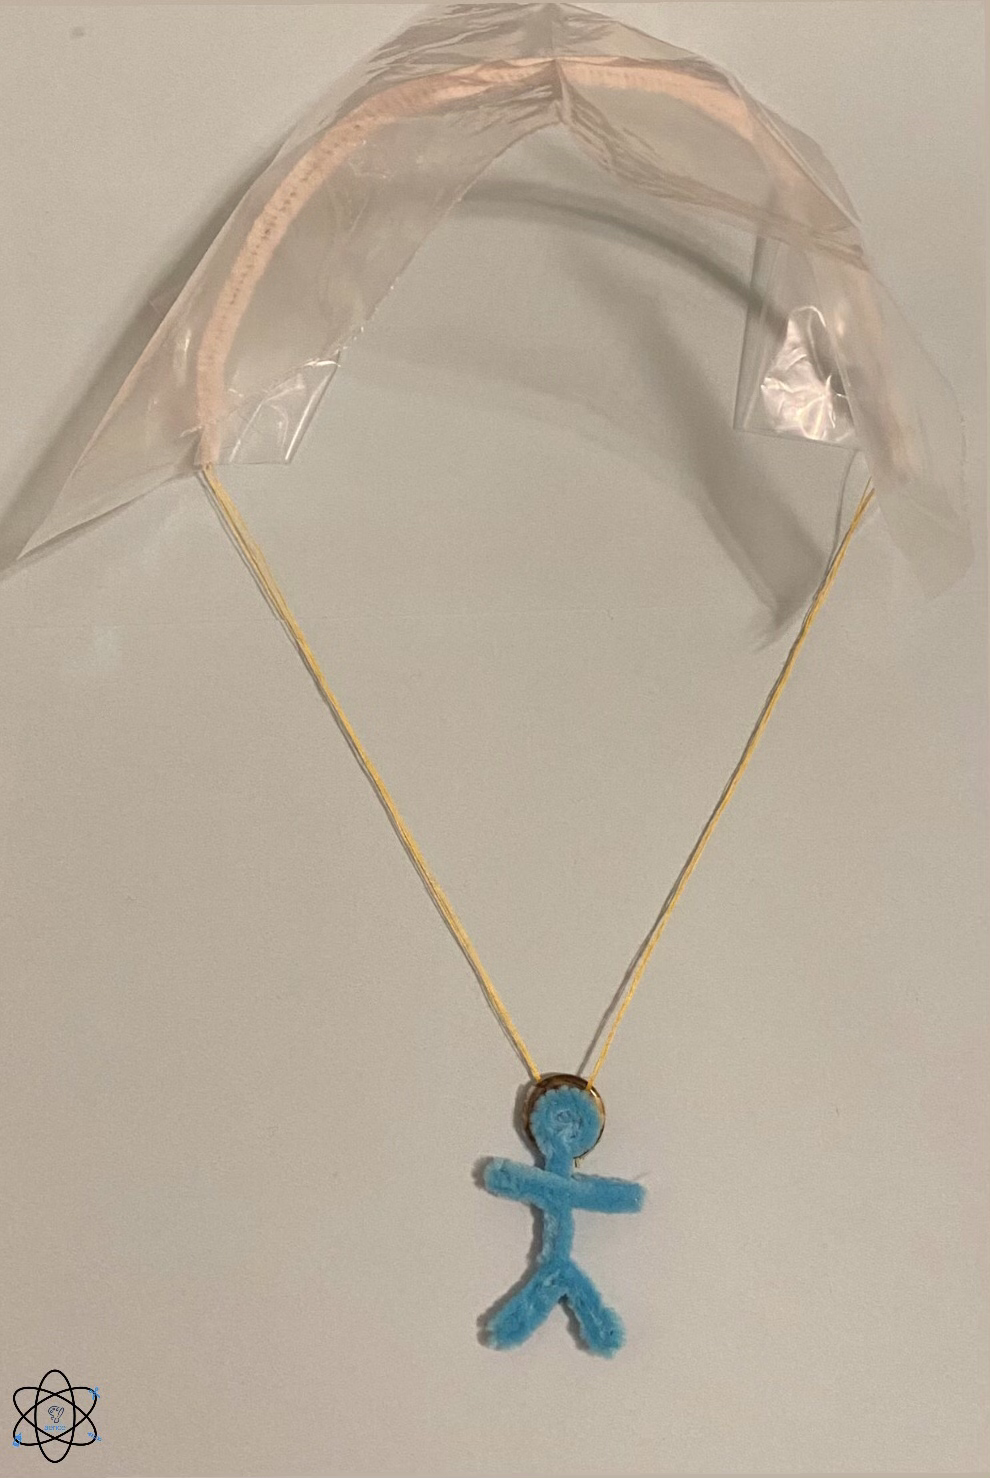
3/31/2021 0 Comments Parachute activityvishista chittalooru and swara repala
In this session we will be learning about the science behind parachutes! This includes learning about Newtons Laws of Motion, force, gravity, and more. We will also be touching on topics such as air resistance to go deeper into the concepts behind parachutes. To demonstrate the concepts we learn through this session, we will be creating a mini parachute. This craft is very customizable, and can be easily changed/added too to make it fly even better. Your children can add pipe cleaner to fortify the parachute, make a stick figure to represent a person attached to the parachute, add decorations/designs, and much more! In addition we will be playing a Kahoot at the end of our session to reinforce the knowledge the children have gained.
materials needed:
- Ziplock bag
- Yarn/thick string - Glue/tape - Scissors - Button or coin (something small with weight) Optional: Coloring/decorative materials and pipe cleaners (recommended) how to
Step 1: Cut your ziplock into a rectangle shape about 4"x5" in size.
Step 2: Cut your yarn/string about 6-8" in length (adjust as necessary). Step 3: Cut this long piece of yarn/string in half and tape or glue it to each end of your ziplock plastic rectangle. Step 4: Cut a pipe cleaner the length of the ziplock plastic rectangle, and attach it to the middle of the ziplock plastic rectangle to reinforce it. This can also be done with paper, a straw, or many other things: be innovative! Step 5: Take your small object (button, coin, etc) and attach both ends of the string to it. Optional: Create a pipe cleaner person to represent a parachuter! Step 6: Release your parachute from a height of 3 feet or higher, and watch it float! the lesson
In this lesson we will be learning about physics, delving into Newtons Law's of Motion, gravity, and force. We will be going into depth about each individual law, providing real world examples of the phenomena. Additionally, we will be touching on advanced concepts such as air resistance to dive deep into the science behind parachutes and provide a more comprehensive overview of the mechanics of parachuting! The craft we will be creating, which is a mini parachute, is a great way to physically demonstrate the concepts we discuss in class, and works to get kids thinking critically about how they can create models displaying concepts they've learned. You can find our more detailed science lesson and craft explanations in the presentation below!
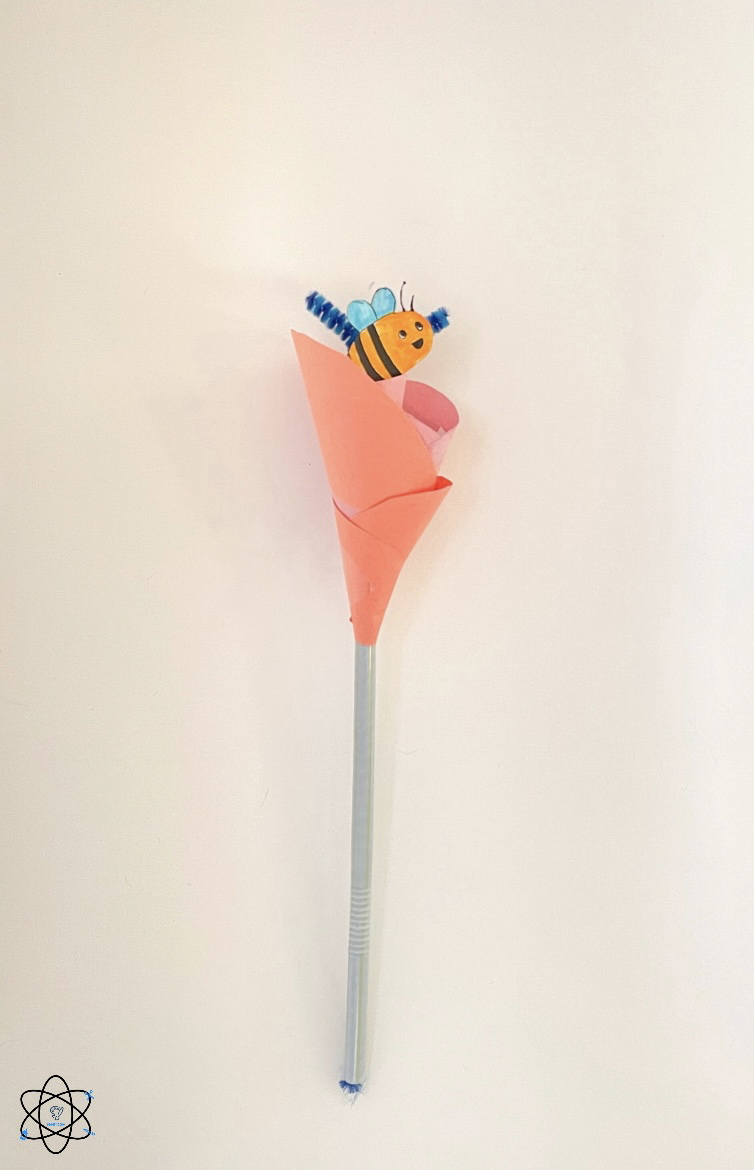
3/23/2021 0 Comments Spring FlowersBy sanjana Kambhammettu and Vishista Chittalooru
In this session, we will be exploring flowers and how they form in honor of spring starting in the Northern Hemisphere! We are discussing the parts of a plant, differences in plant species, and how pollen is spread as we see flowers starting to bloom. The craft will display the various parts and demonstrate to children how pollination occurs. Our recommended age group for this project is 4 to 10 years old, although all ages are welcome!
Materials Needed:
- 2-5 sheets of paper
- Scissors - Glue/tape - Pipe cleaner/straw/pencil - Optional: Coloring materials How to
Step 1: Cut a sheet of paper into a square, following the measurements of " by ".
Step 2: Roll and glue/tape the square into a cone, making sure to leave a hole large enough for the pipe cleaner/straw/pencil, which will act as the flowers' stem, to fit through at the bottom. Optional Step: Draw and cut out petals to glue/tape around your cone, decorating however you would like. Step 3: Insert the stem through the hole, and tape in the middle of the opening, making sure that it is still able to move freely at the top. Step 4: Draw and cut out pollinators, like birds, bees, butterflies, and any other you can think of! If you would like, we have a template available for you to use as a reference, or to print and cut out! Step 5: Glue/tape these around your flower, and move you stem, giving them access to all the pollen! the lesson
The interactive model that will be created in this lesson will demonstrate how pollination occurs. This hands-on recognition and understanding ensures that the child will comprehend the science concept thoroughly. The engagement will allow for a more in-depth understanding of the topic at hand, and more real world connections as spring has arrived. You can find our more detailed science lesson and craft explanations in the presentation below!
|
|||||||||||||||||||||

