|
11/25/2020 0 Comments Arctic Animals Activityby: Vishista Chittalooru and swara repala
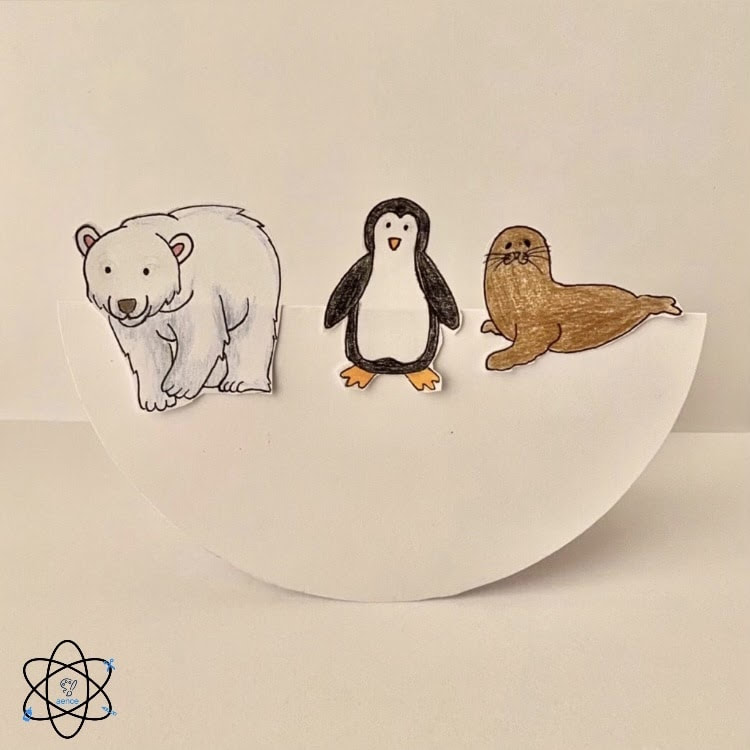
In this session, we will be creating an interactive model of an iceberg with arctic animals on top of it, to learn about hibernation and adaptations. We will also be learning about the weather and climate of Antarctica, with detailed descriptions of wind speeds, temperature highs and lows, and more. The recommended age group for this activity is 4 to 10 years old, however, all ages are welcome!
materials needed:
- 1 sheet of cardstock or construction paper
- Printer paper - Pencil (for drawing) - Scissors - Glue/tape Optional: Coloring materials how to
Step 1: Take a piece of construction paper, or cardstock and fold it in half.
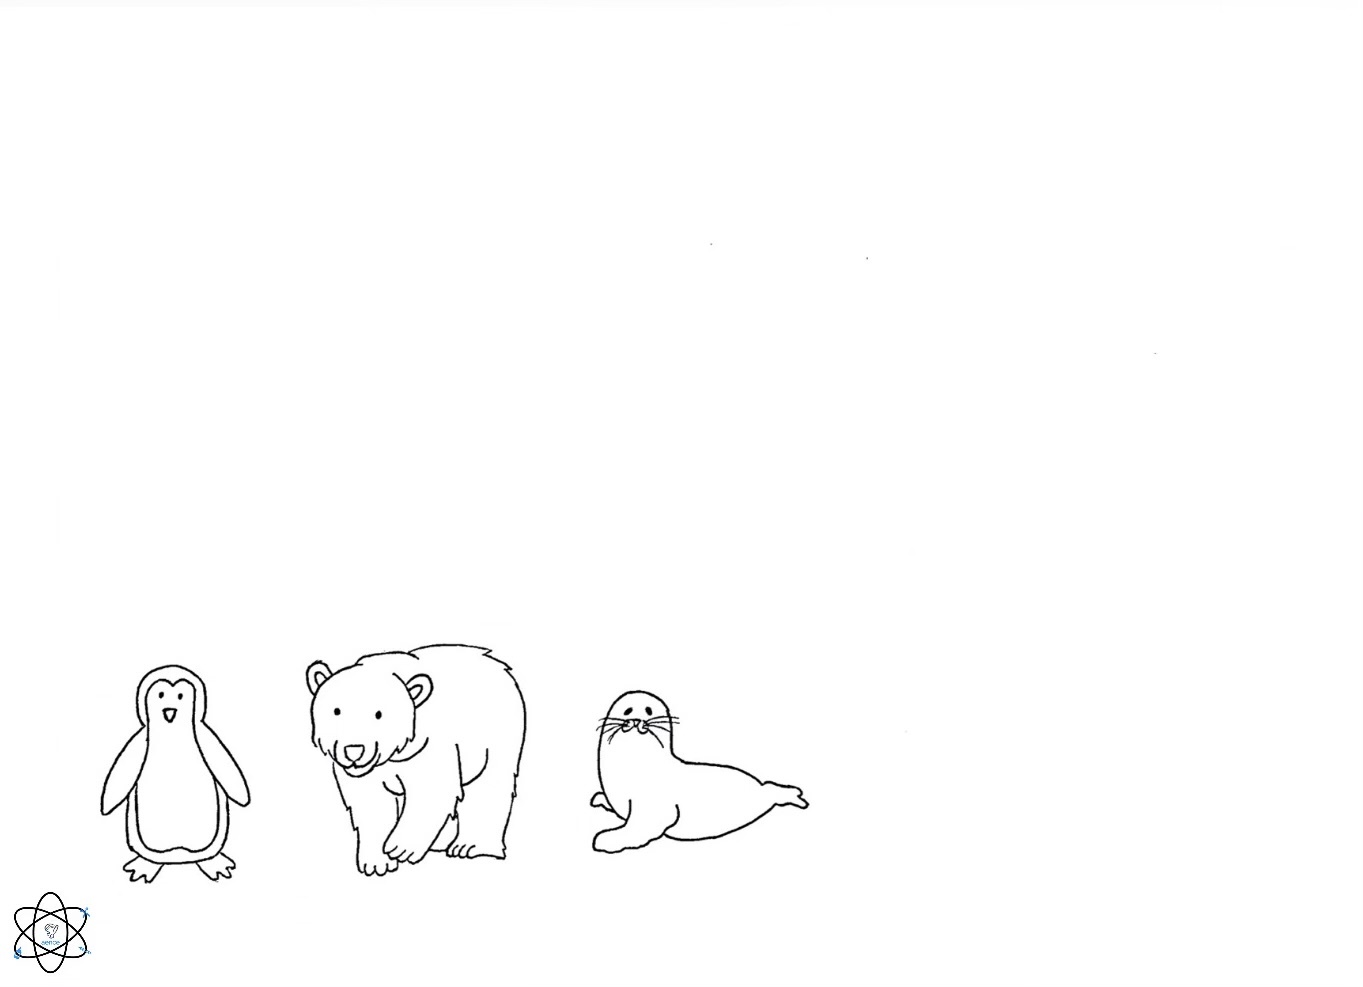
Note: Printer paper will not work as well. Step 2: Cut a half circle on your folded paper. This should give you a paper circle when cut out. Step 3: On a seperate piece of paper, draw a couple of your favorite arctic animals- look at the previous slides for inspiration! Note: You can use our template (found on our website under blog posts) to print and cut out or as a reference for your own drawing(s)! Step 4: Cut out your animals. Step 5: Glue the animals to the top of the folded side of circle. Step 6: Make sure the your folded circle can stand, placing the folded side of the circle up. Step 7: Push down on one end of the circle, and watch it move,mimicking an iceberg! The lesson
In this session, we will be learning about arctic animals, the climate and weather of Antarctica, the adaptations of arctic animals, and the science behind hibernation. While making a iceberg to demonstrate the landscape of Antarctica, the kids will learn about the aforementioned topics, while learning how to think critically and creatively about scientific concepts. You can find our science lesson and craft explanations in the presentation below, along with our printable template for this craft!
0 Comments
11/17/2020 1 Comment Floating Boat DiagramBy Sanjana Kambhammettu and Vishista Chittalooru
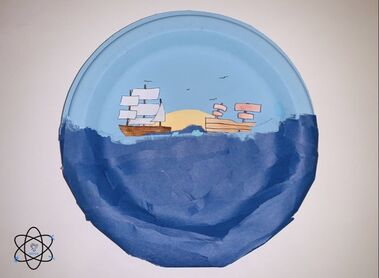
In this session, we will be creating a diagram of a boat in the ocean in order to demonstrate the Archimedes principle in relation to buoyancy and density to understand how it is that such heavy objects can float. This craft is interactive, and will show how ships can sail across the water with the use of these concepts. The recommended age group for this activity is 4 to 10 years old, however, all ages are welcome!
Materials Needed:
- 1 Paper Plate
- 1 sheet of blue construction paper (any paper can be used in place of this) - 1 sheet of white paper - Pencil (for drawing) - 1 or 2 pencil(s)/straw/popsicle stick(s) - Scissors - Glue/tape Optional: Coloring Materials How to
Step 1: Cut a slit in the middle of the plate, but not to the edge. If you would like, you can create an additional slit to make your craft more dimensional.
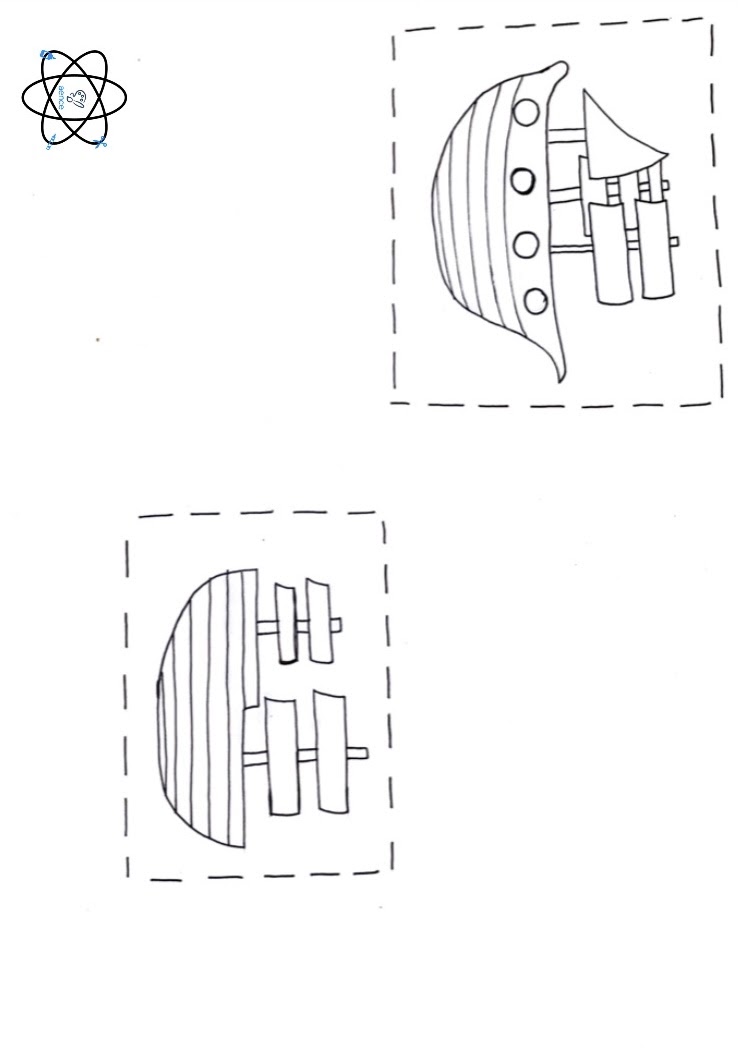
Step 2: Decorate the top half of your paper plate however you would like. This will be the sky portion of the diagram. Step 3: Cut jaggedly or tear construction paper into long strips that represent ocean waves. Step 4: Glue/tape these strips onto the bottom half of your plate, overlapping them. Note: Make sure that your slit(s) remain(s) open. Step 5: Trim off he excess construction paper by turning over the plate to make a clean diagram. Step 6: Draw and cut out a boat of any shape, size, or design. If you have created a second slit earlier, make multiple ships, one for each slit. Note: You can make more than one boat, and use our template below to print and cut out or as a reference for your own drawing(s)! Optional Step: You can color your boat if you would like. Step 7: Glue/tape this to the end of a pencil, a straw, or a popsicle stick. Step 8: Slide your ship(s) into the slit(s) and watch your ship glide across the ocean! The Lesson
Throughout this lesson, we will be learning about Archimedes principle and its relation to buoyancy, an important component in keeping things afloat. We will also be exploring how these subtopics connect to the mass and volume, or density, of an object and in turn, how they may sink. Our model of a boat "sailing: through the ocean allows for a more thorough understanding of all these concepts as it shows directly how the principle works. This hands-on comprehension of the topic will allow for more in-depth knowledge of this information. You can find a more detailed science lesson, along with our free, printable template, below!
11/8/2020 0 Comments Cornucopia Party HornBy Swara Repala and Sanjana KambhammettU
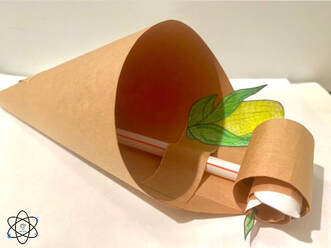
In this session, we will be making a thanksgiving inspired craft, and relating it to the upcoming holiday! We will be creating a cornucopia party horn filled with seasonal vegetables to demonstrate nutrition. Throughout the activity, we will be explaining the 7 main nutrients and different food groups that fall under this. The recommended age group for this activity is 4-10 years old, although all ages are welcome!
MATERIALS NEEDED:
- 2 sheets of paper
- 1 straw - Tape/glue - Scissors - Pencil - Ruler - Optional: Coloring supplies. How To
Step 1: Fold and cut your first piece of paper in half, along the short side.
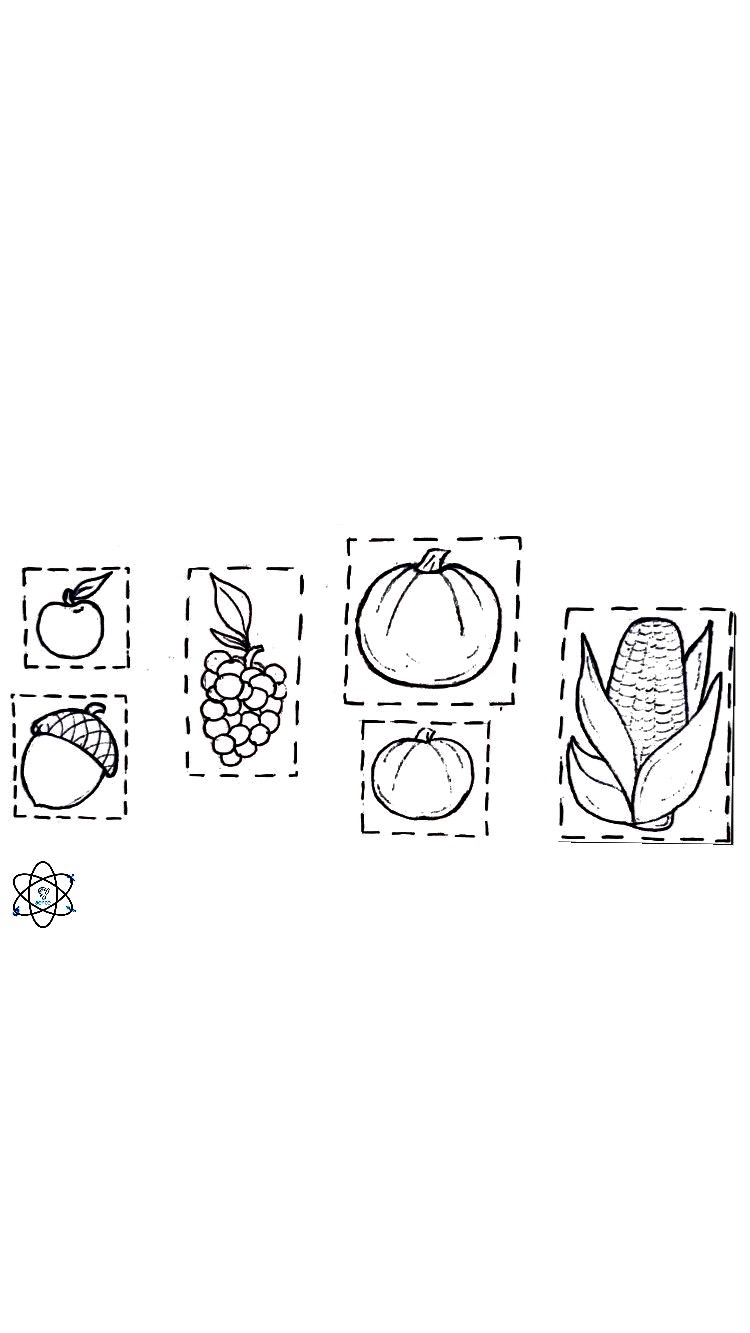
Step 2: Take one half of the paper, and roll it into a cone shape. Secure it with tape or glue, then cut off about 1/2 inch from the closed end, so there are openings on both sides of the cone. Set this aside. Step 3: Using the untouched half of the paper, cut two pieces, in the shape of long rectangles. The size of the first piece should be 2 inches by 8 inches. The size of the second piece should be 1 inch by 2 inches. Step 4: Tape or glue one end of the longer piece of paper (2 in by 8 in) to the inside of the bigger opening of the cone. Step 5: Roll the other end of the strip into a tight roll, with the help of your straw if needed. Step 6: Slide your straw through the cone, with it sticking out of both sides. Step 7: About 2 inches down from the opening, tape down the smaller piece of paper (1 in by 2 in), making sure there is still enough space to slide the straw up and down. Your party horn should be taking shape! Step 7: On the unused part of the paper, or another sheet, draw, color, and cut whichever fruits and vegetables you would like to have in your makeshift cornucopia. Step 8: Tape these to the rolled up part of your party horn, and around the opening, decorating it however you would like. Step 9: Slide the straw into its opening, and blow into it. Your cornucopia party horn is complete! The lesson
Throughout this lesson, we will be learning about nutrition, and how it connects to the fruits and vegetables inside the cornucopia. We will be focusing on the 7 nutrients, and the many different food groups. This hands-on creation of a cornucopia connects the children's new knowledge to the thanksgiving holiday, and to their daily lives and food habits. This ensures that the information learned will be retained, and also enhances creativity and critical thinking skills. You can find our craft explanations and science lesson below, along with our free, printable template.
11/3/2020 0 Comments Rocketship ActivityBy Vishista Chittalooru and swara Repala
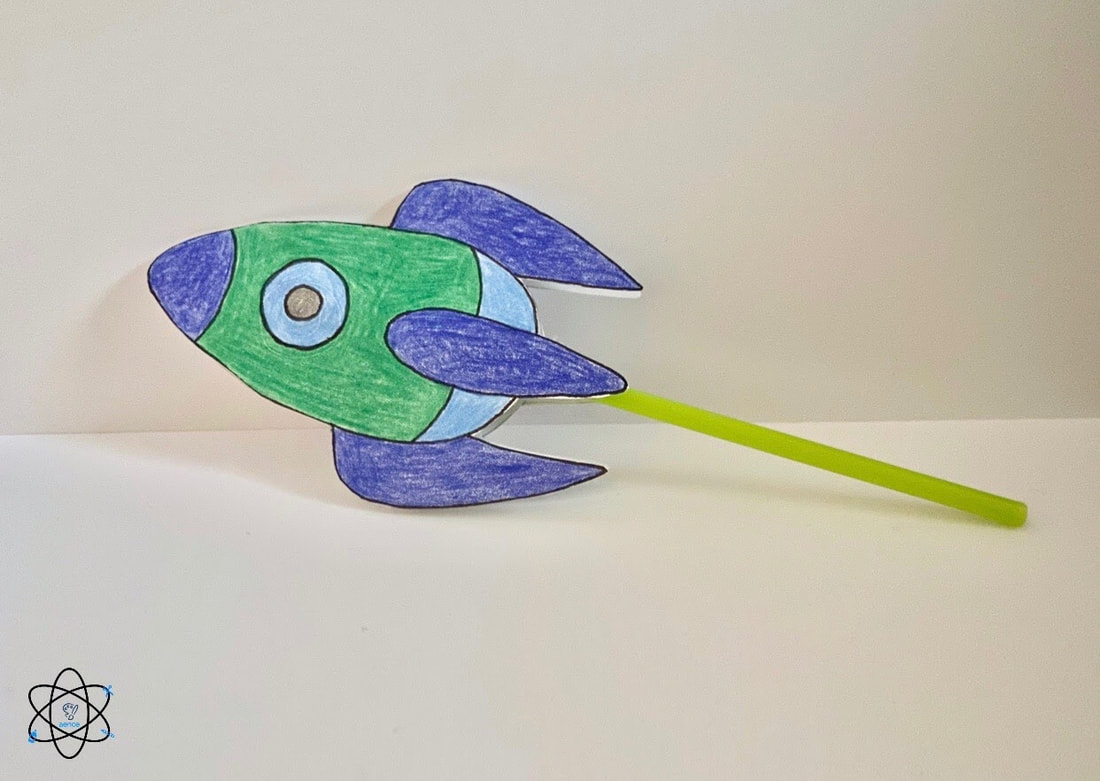
In this lesson we will be creating a rocketship in order to learn about space, our solar system, the galaxy, and objects in space such as meteoroids. This craft is interactive, enabling your child to let their rocketship "blast off" by throwing it into the air. The recommended age group for this activity is 4 to 10 years old, however, all ages are welcome!
Materials needed:
- 1 piece of paper
- Pencil - Scissors - Glue or Tape - 1 straw - Optional: Coloring materials How to
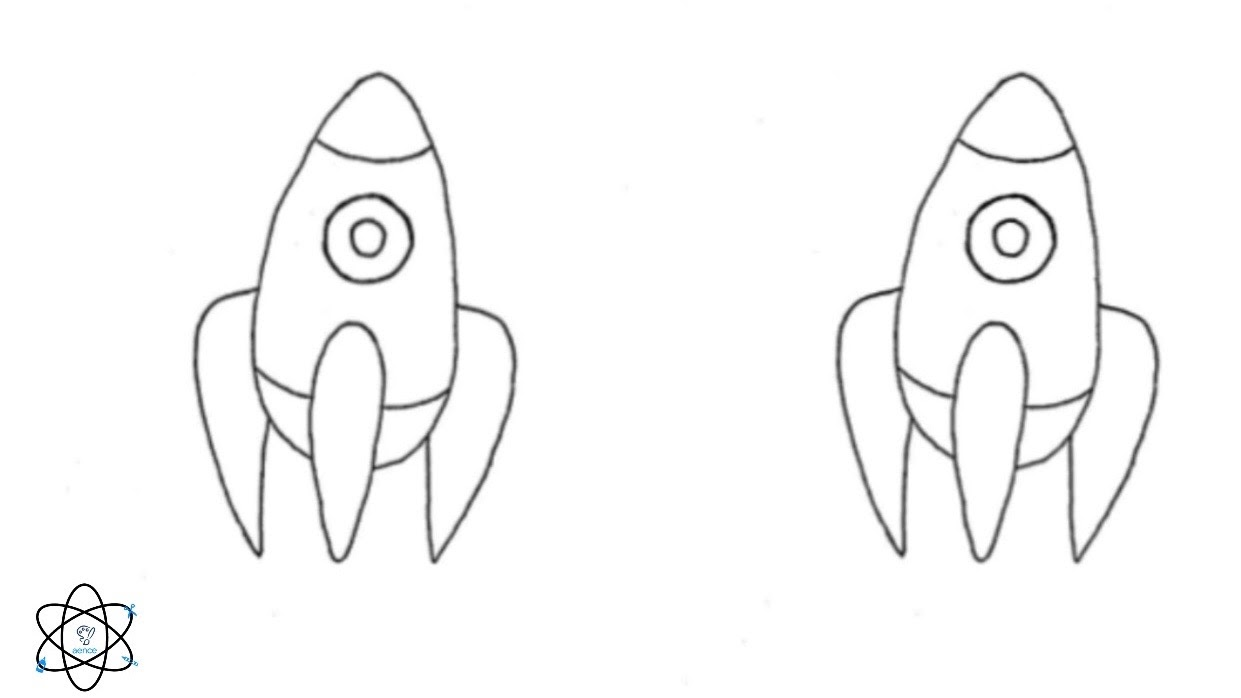
Step 1: With your pencil, draw 2 rockets on your paper, making sure they're the same size. If you'd like, you can print out our free template to cut out and color to create your rockets, or use it as a reference to draw your own! The downloadable template can be found below.
Step 2: Using a pair of scissors, cut out your rockets. Step 3: Making sure to leave a small opening for the straw to fit through, tape or glue the rockets together, creating a "pocket". Step 4: Put tape or glue on the sides of your straw and put it through the opening in the rocket, to secure the straw inside the pocket. Step 5: Throw your rocket and watch it fly! The lesson
In this session we will be learning about space, exploring topics like planets, galaxies, nebulas, asteroids and meteoroids, and comets! While making a rocketship to demonstrate traveling into outer space, the kids will learn about the topics mentioned, while learning how to think creatively and critically about scientific concepts. You can find our science lesson and craft explanations in the presentation below, along with our printable template for this craft!
|
|||||||||||||||||
