|
12/29/2020 0 Comments Moving Caterpillar ActivityBy: Vishista Chittalooru and swara repala
In this session we will be creating an interactive craft showing the movement of a caterpillar on a leaf. We will be understanding the caterpillars place in an ecosystem, more specifically in a food chain and food web. In addition to exploring the functions and differences between a food chain and a food web, we will be learning about producers, consumers, the different types and levels of each, and more! This lesson is aimed towards children between the ages of 4 and 10, however, anyone is welcome to join us!
materials needed:
- 2 sheets of paper
- Pencil - Scissors - Straw/pencil - Pipe cleaner - Glue/tape (liquid glue is recommended) Optional: Coloring materials how to
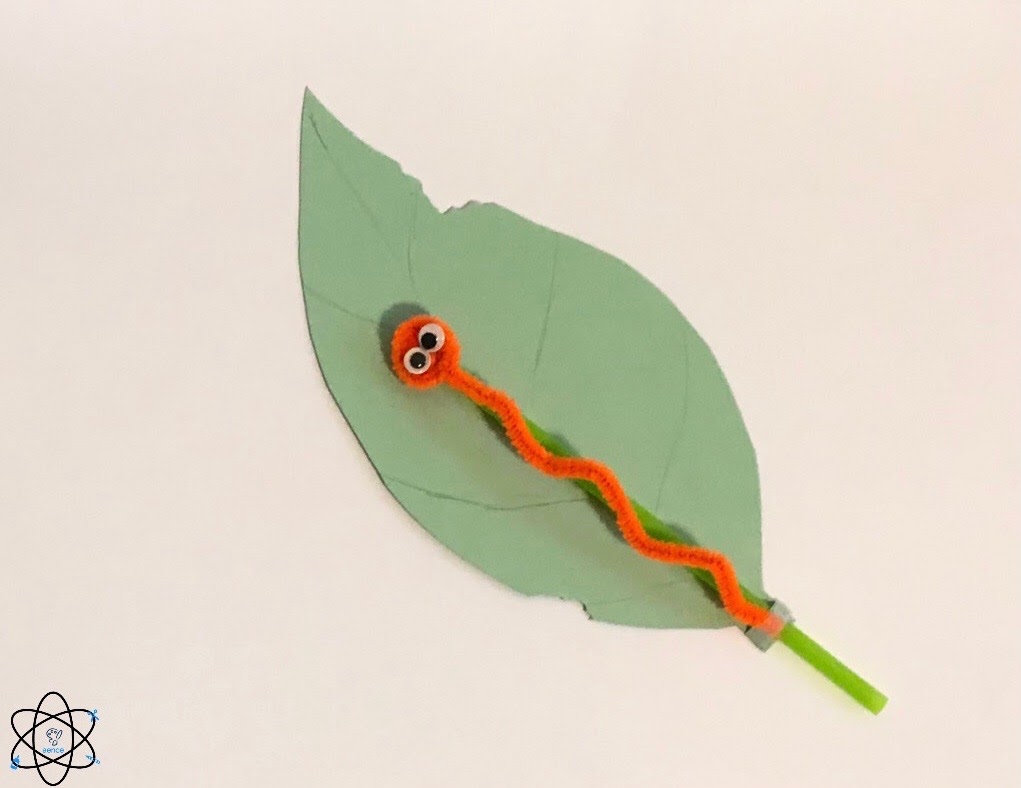
1. Draw a medium sized leaf on your piece of paper, and cut it out.
Optional: Color/add details to the leaf if you would like. 2. Cut out a rectangular strip of paper. 3. Glue this paper strip down at the end of your leaf, leaving a big enough opening for your straw/pencil to fit through. 4. Put the straw/pencil through the tube. It should be able to move freely. If you have a pipe cleaner: 5. Glue/tape one end of your pipe cleaner to the top of the paper tube. 6. Glue/tape the remaining end to the top of your straw/pencil. If you do not have a pipe cleaner: 7. Cut out another rectangular strip of paper. 8. Fold back and forth to create an accordion/spring shape. This will be your paper caterpillar. 9. Glue or tape one end of your paper caterpillar to the top of the paper tube. 10. Glue or tape the remaining end to the top of your straw/pencil. Optional: Add details to the beginning of the pipe cleaner/paper caterpillar, making it look like a caterpillar. For example, adding eyes and color. 11. Push your straw or pencil up and down, and watch your caterpillar move! the lesson
In this lesson we will be exploring the place of an organism within a food chain, and how it is interconnected with their place in food webs, and the ecosystem. We will be identifying different kinds of animals, learning about what makes them producers or consumers, and going into detail about the specifications of each and the levels they occupy within their food chains. Additionally, we will be examining the differences between a food chain and food web, and learning how to differentiate between the two. The hands of nature of the activity esures comprehension of the topics discussed, while promoting a creative, but critical outlook on day to day situations. With this method of teaching, children will be able to identify the topics discussed within the lesson - food chains, food webs, producers, consumers, and more- in their own backyards! You can find our detailed science lesson below!
0 Comments
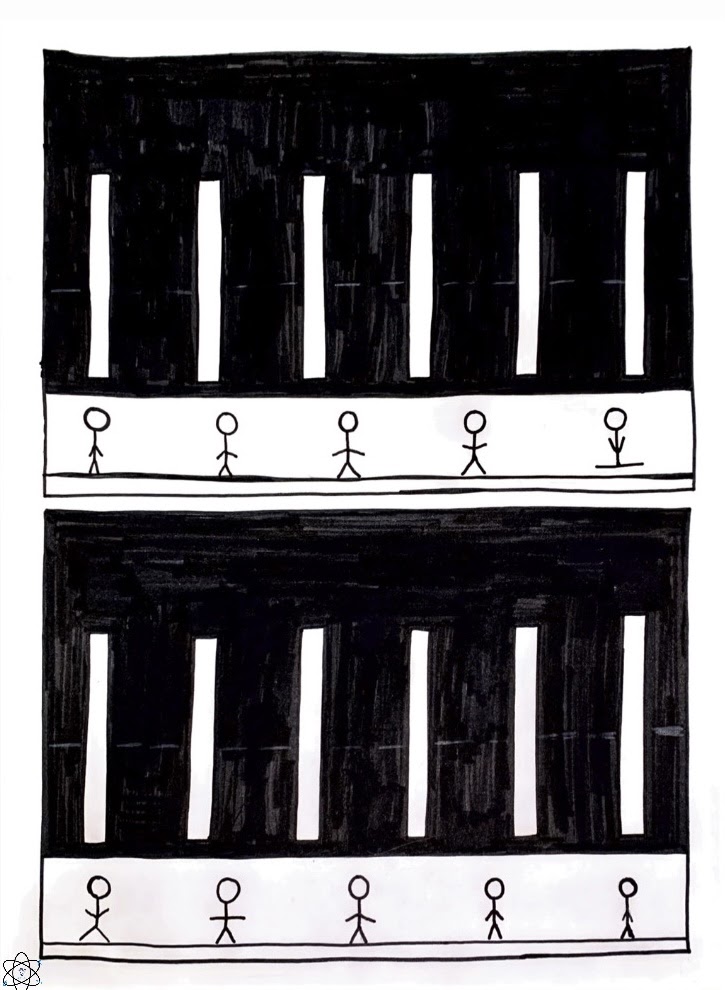
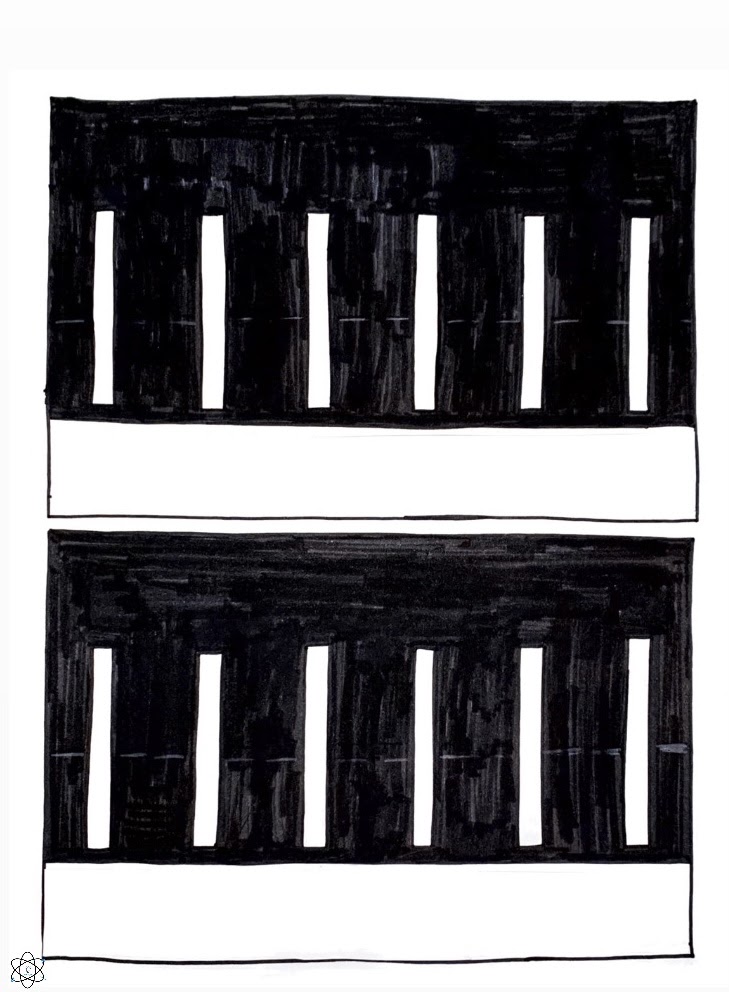
12/23/2020 0 Comments Zoetrope ActivityBy Sanjana Kambhammettu and Vishista Chittalooru
In this session, we will be creating a zoetrope, which is an interactive toy that produces optical illusions, and creates the effect of moving images out of static pictures. It is an early form of animation technology, and its techniques are still in use today! We will be exploring concepts related to optical vision, and understanding the shift in perspective of how one interprets a moving object. Our recommended age group for this activity is 4-10 years old, as always, although all ages are welcome!
Materials Needed:
- 2 pieces of paper(preferably one white and one dark colored) OR our template below (highly recommended)!
- Paper plate - Scissors - Ruler - Tape/glue stick - Pencil, dowel, or any object that can be used as a spinner - Writing utensil How To
If you are using one of our templates below (HIGHLY recommended):
Step 1: Print and cut out our template! You can either choose to use the one without images on it, so your child can draw their own moving objects, OR the one with pre-drawn figures for them to color. Note: We will be referring to this as a "castle wall" for the best description and your understanding. Step 2: Fold along the dotted lines of the template. Step 3: Cut out the white rectangles in between the "castle wall." Step 4: Attach both ends of the two "walls" together using tape or a glue stick. If you are not using one of our templates below: If you would like to create one from scratch, follow the template as a reference to create your own. Step 1: Draw animated objects on your white sheet of paper. Step 2: Glue this to the sheet of dark colored paper. Step 3: Cut this in a castle-like shape, with rectangle strip cutouts of around 1.5 inches by 2 inches at the top. Step 4: Repeat for the second strip, and attach both ends of the two "walls" together using tape or a glue stick. Whether or not you are using a template, follow the last steps of this craft below: Step 5: Cut a hole in the center of your paper plate, big enough poke your pencil/dowel/object through. Step 6: Tape the now cylindrical "castle wall" to the middle of the paper plate. Step 7: Insert your pencil through the hole, and spin your diagram. You have now finished the activity and can spin it to watch your objects animatedly moving at high speeds! The Lesson
In the process of creating this craft, we will be learning about many concepts relating to optics, such as persistence of movement, beta vision, and more! This engagement will allow for a deeper understanding of how objects move, and how the brain perceives that. You can find our science presentation with more thorough explanations, and both of our free, printable craft templates down below!
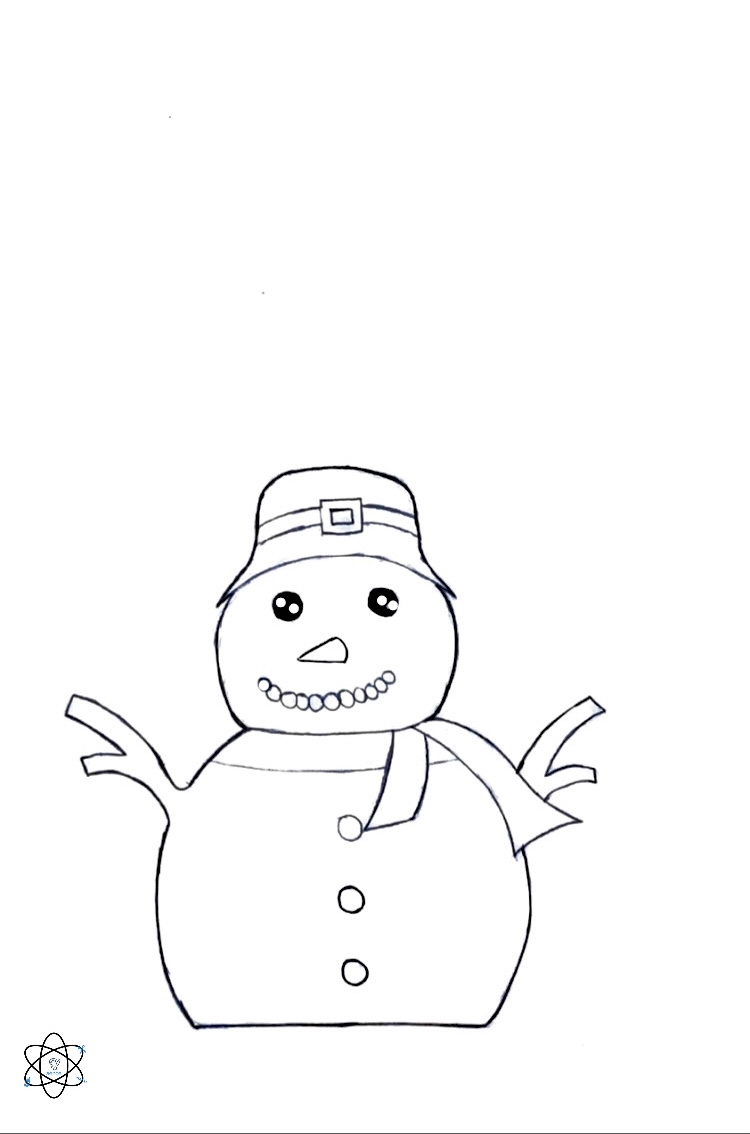
12/14/2020 0 Comments melting snowman activityby: VISHISTA CHITTALOORU, Sanjana Kambhammettu, and Swara repala
In this session, we will be creating an interactive model of a snowman melting in order to learn about the different kinds of heat transfer, understand the concept of wind, and more! We will be going into detail about individual kinds of heat transfer, and real life examples of them that can be observed at home. In addition, we will also be exploring the influence of wind on different types of heat transfer, such as convection. This lesson is aimed towards children between the ages of 4 and 10, however, anyone is welcome to join us!
Materials needed:
- Paper plate
- Sheet of (white) paper - Scissors - Pencil - Tape - Straw - Optional: Coloring materials how to
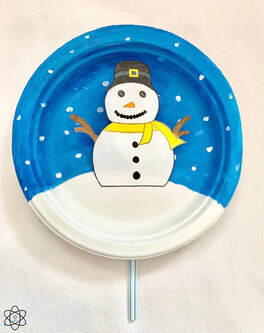
1. Trace a circular line about 2 inches from the bottom (or however big you would like it to be) to create you snowy ground! The rest will be your sky.
2. On the line you traced, cut a small slit near the center of your line. It should be big enough for a straw to fit through and move smoothly. 3. Color your sky (we recommend blue), and with a colored pencil or marker, draw snowflakes all over your plate. 4. On a piece of paper, draw your snowman shape, or cut out our template provided below! 5. If you would like to do so, you can color your snowman as well! 6. Use tape to attach your snowman to a straw. Attach the straw at the top of the snowman, in the middle of his head. 7. In a downward motion, on the front side of the plate, put the straw through the slit. 8. Pull your snowman down, and watch it melt! the lesson
In this lesson, we will be exploring topics like heat transfer and it's specific types, and the effects of wind on heat transfer, while providing multiple examples of heat transfer in everyday life. Our interactive diagram depicts a snowman melting, being show by being pushed up and down by the child. The hands of nature of the activity esures comprehension of the topics discussed, while promoting a creative, but critical outlook on day to day situations. By employing this method of teaching, by the end of the lesson children will be able to identify what type of heat transfer they see throughout their day! You can find our detailed science lesson, along with our free, printable template, below!
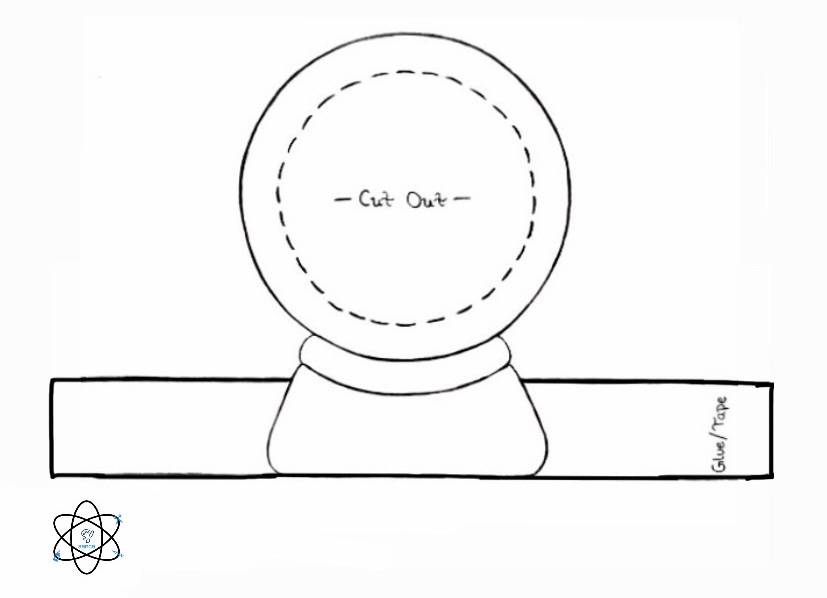
12/13/2020 0 Comments moon phase sliderby: Vishista Chittalooru
In this session, we will be creating an interactive slider to learn about lunar phases. We will be going into detail about the individual phases of the moon, and provide mnemonic devices to jog your memory and add to your understanding of this topic. And, as well as learning about the phases of the moon, we will also be discussing why they, and other major celestial events, such as a lunar eclipse, occur.
materials needed:
- 3 sheets of paper
- Tape/glue/stapler - Scissors - Pencil - Optional: Circular object and coloring materials how to:
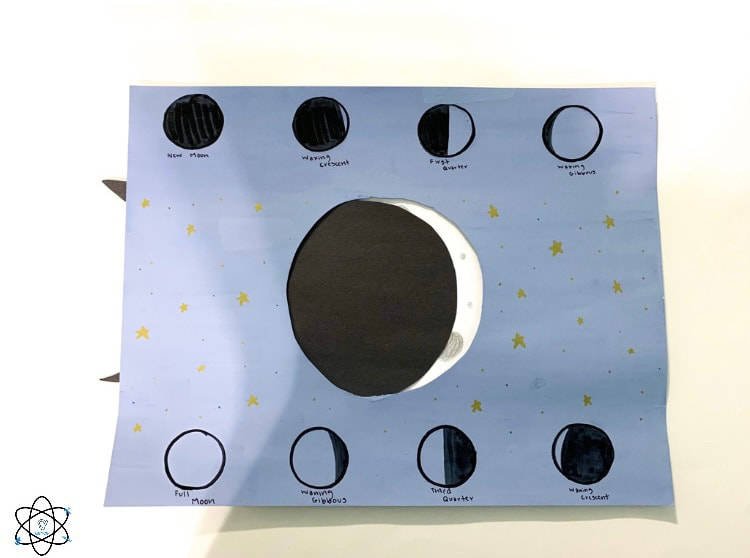
1. On your piece of paper (colored or otherwise), use a circular object to trace a medium sized circle in the middle.
2. Cut out your traced circle. Note: For Steps 3-6, we have a template for you to use and cut out, instead of drawing, or to use as a reference. You can find it below! 3. Put the white circle at the edge of the black construction/ printer paper, and trace the left half of the circle to make a C shape. 4. Then trace straight lines from the C on your paper, about 8 inches long to create a long U shape! Adjust the size of your U as needed in order to completely cover the circular hole we made in Step 2. 5. Put the previously cut out circle at the end of the lines you have drawn, and trace the left half of the circle (it should look like you’re tracing a C shape). This is our slider! 6. Cut out your slider. 7. Get a white sheet of paper. 8. Tape the white sheet of paper to the LENGTH (longest side) of the paper you cut in Step 2. You should now have a white circle in the middle of your paper. This will be our moon. 9. If you would like, you can add details to you moon, like shown in the picture below! 10. Put your slider in the middle of the two papers (like a sandwich). You should be able to slide it back and forth easily. 11. Position your slider, and watch your moon change phases! Note: You can decorate your diagram by drawing the phases of the moon in order to help you remember, decorating with stars, and coloring! The lesson:
Throughout the lesson, we will be learning about our solar system with a focus on our Moon, and expanding to learn about other planets' moons in order to observe the contrast between them and Earth. While doing so, we will be discussing the lunar cycle by going into detail about individual phases of the moon and why they occur. In addition, we will also be teaching helpful tricks to remember the 8 phases of the moon that can be used in combination with the interactive slider to increase comprehension. The use of hands-on learning to create the interactive slider while learning about the moon, its phases, celestial events, and more, increases understanding, and promotes critical thinking and creative ability in children. You can find our detailed science lesson below!
12/6/2020 0 Comments the science of snowflakes It is the most wonderful time of the year! December has started with its usual gusto, with so many things to look forward to - family, holidays, and more! We are still continuing our traditions, whether that be ice skating, hot cocoa, putting up a Christmas tree, or setting up outdoor lights. I, for one, am most excited for snow. Though it has been a while since we have had snow in December or had a white Christmas, I still find myself checking the forecast every day! Snow makes everything magical, transporting you to a winter wonderland where everything is still and soft. It seems as if the white landscape before you holds countless adventures, beckoning you to embark upon them. And this is where most people stop. They see the piles of snow before them and comment on how beautiful it is. They jump onto the snow and make snow angels or snowmen. This is all well and good, but what if I told you there was something even cooler - see what I did there - than snow? You probably would not believe me, right? Well, let me share the awesome science behind snow!
First, a little bit of backstory is in order. Wilson Bentley was an American meteorologist born in the small town of Jericho, Vermont. And if you know anything about Vermont, it is highly unlikely that they have a shortage of snow during the winter months! Vermont is known for its beautiful snow-capped peaks, natural beauty, and magical winter months, and like everyone else, Wilson Bentley loved it. He loved snow so much that he took it upon himself to take detailed photographs of snowflakes, and being the first to do so, earning him the nickname “Snowflake Bentley”. A few of his photographs are pictured below. Over his lifetime, he managed to take 5,000 pictures of snowflakes, leading him to the conclusion that no two snowflakes are alike. Throughout his career, every single snowflake he documented was completely unique. How can that be, you ask? Snowflakes begin to form when extremely cold water droplets freeze onto particles in the sky, like pollen or dust, creating ice crystals. As these fall to the ground, water vapor freezes onto the primary crystal, building new crystals – which we know as the six arms of the snowflake. Each individual snowflakes follow slightly different paths and conditions on their way to the ground, causing changes in their shape and formation. The slightly different changes like collisions with other snowflakes, changes in temperature and humidity, or wind patterns all play a role in the final appearance of snowflakes that we see when they reach us. Isn’t this amazing? Every single snowflake endured different conditions on their way to the ground, causing them to be unique from the billions and billions of others. The snowflake on your tongue cannot be found anywhere else. So next time you go to catch snowflakes, remember that it is unlike any other! 12/6/2020 1 Comment Sleep Cycle DiagramBy Sanjana Kambhammettu
We will be exploring the topic of sleep and its importance in this Winter Camp activity. Through the diagram that we will be creating, it can be seen how our minds travel through the various stages of sleep, and what is occurring in our bodies at that time. We will also learn about our internal clocks, or Circadian rhythms, and sleep disorders one might attain if they do not get enough rest. And, if you have ever wondered how dreams occur, or why you may sometimes feel like you have not fully slept through the night, come to our session to find out! This lesson is aimed towards children between the ages of 4 and 10, however, anyone is welcome to join us!
Materials Needed:
- 2 sheets of construction paper/card stock
- 1 sheet of printer paper - Scissors - Regular tape/double-sided tape - Glue stick - Penny/quarter/small 3-dimensional object - Marker/sharpie/pencil - Optional: Coloring Utensils How To
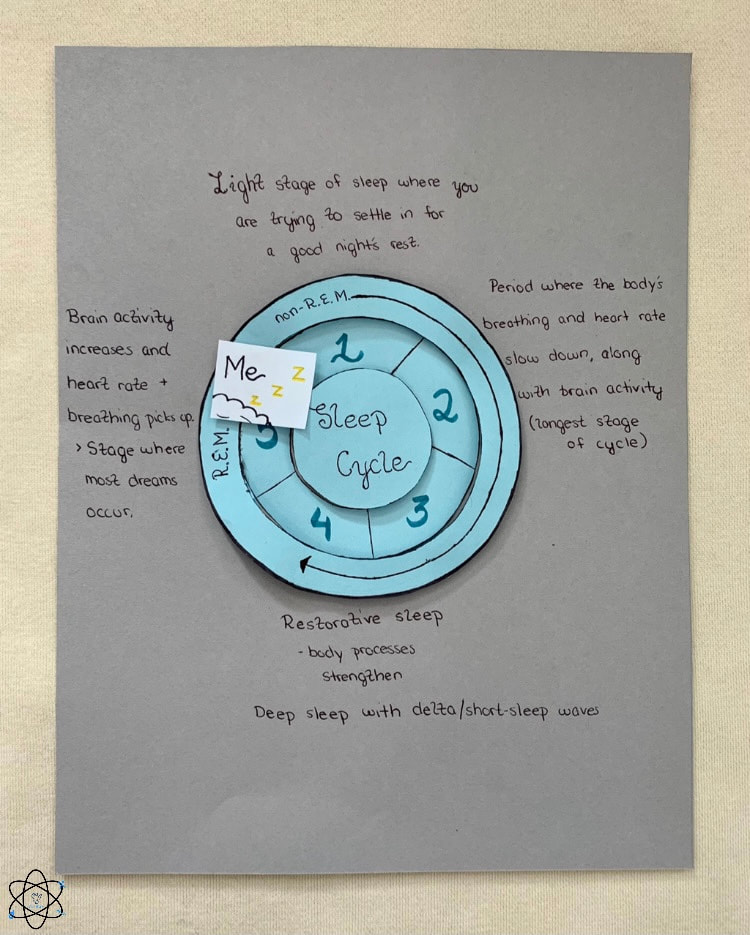
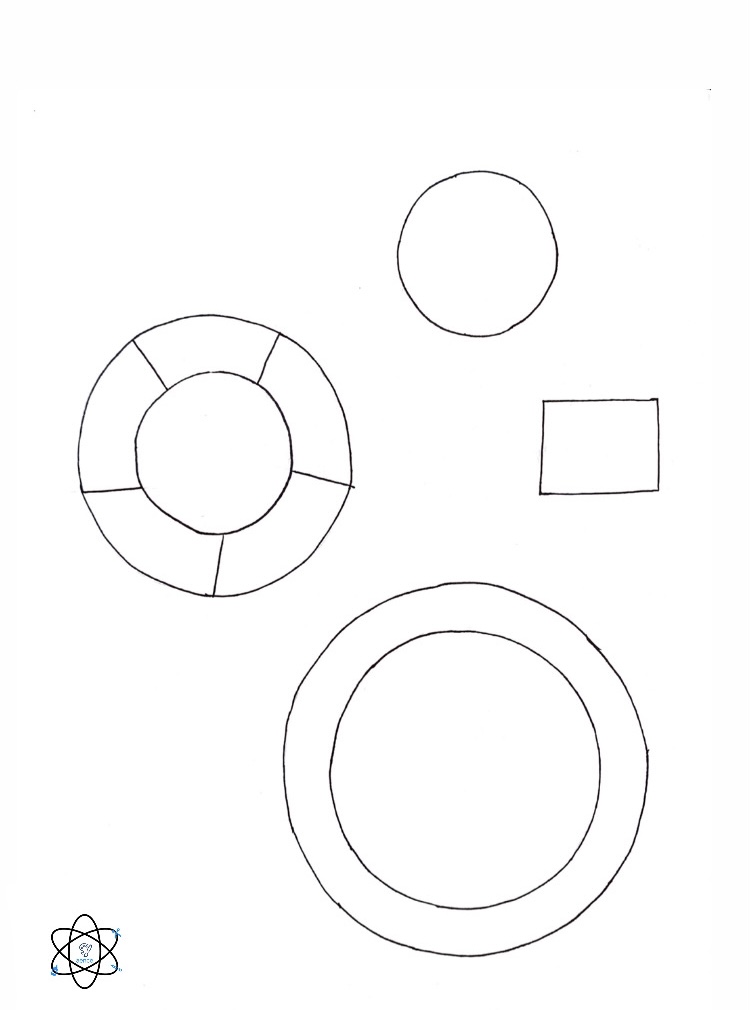
Step 1: On your sheet of printer paper, draw and cut out 3 circles that will fit inside one another. You can use the template below as reference or to print and cut for your own diagram.
Step 2: Glue the middle sized circle down on your sheet of construction paper. Step 3: Label the the sections on that circle from 1-5, going clockwise. Step 4: In the general area of the sections, label 1-4 as non-REM and 5 as REM sleep on the edge of the biggest circle. You can add an arrow to connect these if you would like. Step 5: Take your double sided tape of folded strips of paper (about 1 inch wide and 3 inches long; fold in zig zag pattern) and tape the on the back rim of the largest circle. Do this as many times as you would like, making sure all sides will stay in place, and elevate the circle (for reference, the template required a minimum of 5 strips to hold it up securely). Step 6: Align the circles and tape all the sides down, making sure the biggest circle is raised. Step 7: Place your coin or small 3-dimensional object on the inside of the lifted platform. Step 8: Label your smallest circle "sleep cycle" or something similar. Step 9: Add double sided tape or folded strip(s) of paper on the back of the smallest circle, and align it on the inside. Make sure it is is risen above the coin. Step 10: Cut out a square, rectangle, or any shape that will represent you. Step 11: Tape this onto the coin or object, and place the corners above the circles. Step 12: The outside of the circle slider diagram will be your information section. On your infographic, note down things about each sleep stage around all your circles. You can add as much or as little detail as you would like to remember and distinguish each stage of the sleep cycle! You can use the picture below as a guide of what to write down. Step 13: Now, you can watch yourself sliding through each of the sleep stages and the sleep cycle. Sweet dreams! The Lesson
In this session, we will be exploring sleep related topics and creating an interactive infographic that will teach about the different stages of sleep. This activity will ensure visual connections, as every time the children look at the diagram, they will observe the shifting of the cycle. And, reading the description of each part will help them recollect the details about the body's natural clocks and the reasoning behind their dreams. This fascinating information will also help them remember how important it is to get a good nights rest. You can find our detailed science presentaion and our free, printable craft template down below!
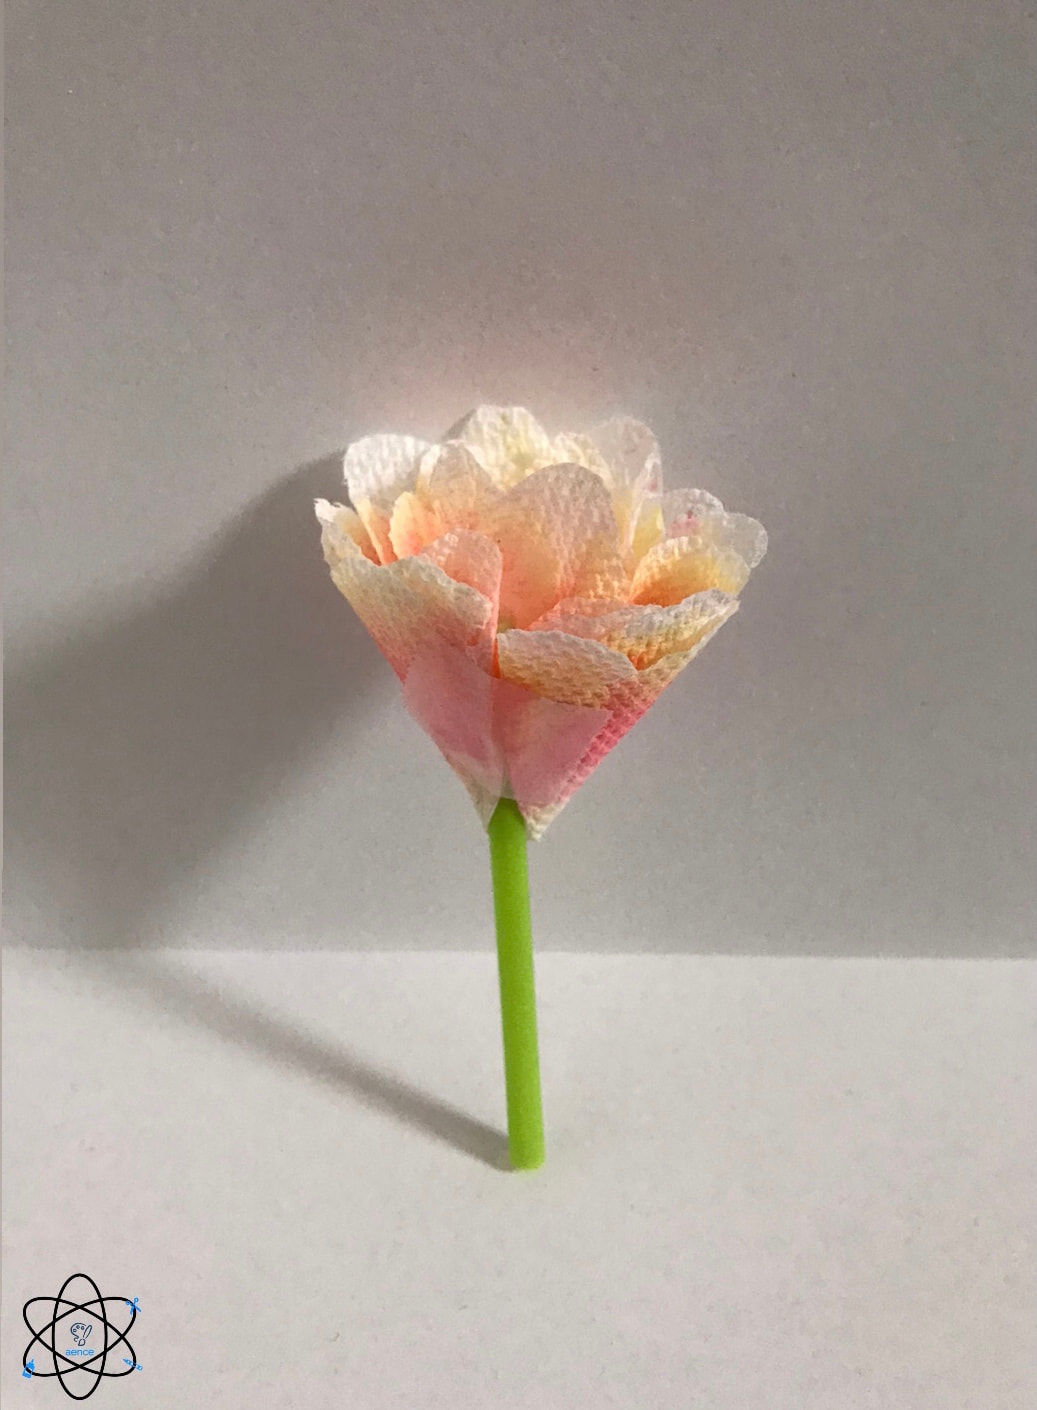
12/5/2020 0 Comments Chromatography FlowersBy Swara Repala
The first topic that we will be covering in our Winter Camp is chromatography. We will perform paper chromatography using washable markers, and turn it into a set of flowers! It is important to note that this craft does have some drying time. We will discuss all things chromatography, by covering what it is, what it is used for, the different types of chromatography, who performs it, and how to conduct it. This activity is recommended for children aged between 4 to 10, however, all ages are welcome!
MATERIALS NEEDED:
- 3-4 paper towels or coffee filters
- Washable markers - 1-2 straws - 1 disposable cup filled with water - Tape HOW TO
Step 1: Cut out a 4 inch by 4 inch square of paper towel or coffee filter.
Step 2: Using washable markers, draw a circle in the middle of the square. You can use as little or are many colors as desired. Step 3: Fold the square in half, and in half again. The color should be in one corner. Step 4: Dip the paper towel or coffee filter into the water, but do not let the water touch the colored portion, just under it. Let the water spread the colors to the top. Step 5: Unfold your paper towel or coffee filter and place it onto a paper towel to dry. Step 6: Once dried, fold it in half, and tape half of a straw to the middle, which will act as the stem to your flower. Step 7: Bring both sides of the paper towel or coffee filter together, creating a circle around the straw. Step 8: Adjust the sheets of the paper towel or coffee filter to look more like a flower. THE LESSON
In this session, we will explore the various aspects of chromatography, including Liquid Chromatography, Gas Chromatography, Thin-Layer Chromatography and Paper Chromatography. For each type of chromatography, we will review what it is, what it is used for, and how it is performed. The kids will have the opportunity to create Paper Chromatography, and see the mixture of inks in their washable markers. They will be able to get a true hands-on experience, and be able to compare their results to those of others in class. This will reinforce all of the information they have learned, enhance critical thinking skills, and push creative boundaries.
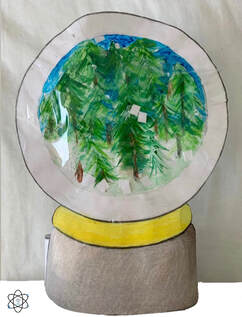
12/1/2020 0 Comments Snowglobe ActivityBY SWARA REPALA AND SANJANA KAMBHAMMETTU
In this session, we will be creating an interactive paper snowglobe with a winter scene picturing evergreen trees, such as pine trees. This craft will demonstrate various winter related topics, such as the difference between deciduous and coniferous trees, and the importance of plant dormancy. The recommended age group for this activity is 4 to 10 years old, but, all ages are welcome as always!
MATERIALS NEEDED:
- 1 sheet of paper
- 1 to 2 ziplock bags - Sharpies or any permanent markers - 1 pencil (for drawing) - Scissors - Glue stick - Optional: Popsicle stick, sequins HOW TO
Step 1: Draw a snowglobe with a rectangular base. Use our template below as a reference for your drawing, or to print and cut out!
Step 2: Cut out the snow globe and its center circle. Step 3: Glue one ziplock to the back edge of the snowglobe. Step 4: On the front side of the craft, use your Sharpies of other permanent markers to draw a winter scene with trees onto the ziplock, through the open circle. Step 5: Cut out squares of paper or use sequins as your snowflakes, and put them in the center. Step 6: Glue the other ziplock on the front side of the circle, sealing it shut. Step 8: Cut the ziplocks along the edge of the snowglobe, creating the shape. Step 8: Place glue or tape on the end of the rectangular base, and attach both ends together, making a ring or hoop. Step 9: Shake your snowglobe and watch the snowflakes fall! THE LESSON
Throughout this lesson, we will be learning about various topics that contribute to how some trees keep their leaves in the winter, and others shed them. The subtopics we will be exploring are deciduous trees, coniferous trees, photosynthesis, and dormancy. Our interactive paper snowglobe depicts evergreen trees in a snowy climate, and gives a visual representation of coniferous trees. The hands-on process of making this craft creates connections and enhances critical thinking skills, which contributes to an in-depth understanding of the information learned. You can find our detailed science lesson, along with our free, printable template, below!
|
|||||||||||||||||||||||||||

