|
8/27/2020 0 Comments Pencil Catapult ActivityBy Vishista Chittalooru and swara repala
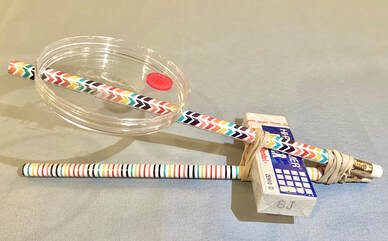
In this session, we will learn how to make a pencil catapult, to learn about Newton’s Laws of Motion! This activity focuses on Newton's Second Law of motion, and demonstrates it through the launching of the catapult. The recommended age group for this project is 5 to 10 years old, although all ages are welcome!
MATERIALS NEEDED:
- 2 pencils
- 2 to 4 rubber bands - An eraser - A bottle cap - Something to launch (a button, small rubber ball, paper clip) How To
Step 1: Take 2 pencils and put an eraser in between them, about an inch from the end of the pencil.
Step 2: Wrap a rubber band around the 2 pencils, right in front of the eraser. Step 3: Take another rubber band and wrap it around the middle of the 2 pencils. *In Steps 2-3, you can use as many rubber bands as you need to make it tight and secure!* Step 4: Take your bottle cap, and tape it onto the top pencil (the end without the eraser). Make sure you leave space at the end of the pencil where you can push down. Step 5: Place the object that you will be launching into your bottle cap. Step 6: Push down and launch! the lesson
Throughout this class, we will be explaining Newton’s Laws of Motion. The kids would learn about Newton’s three laws detailing force, inertia, acceleration, action and reaction, and more. They will see how these topics affect their catapult, for example, how the amount of force they apply when launching changes the how far the object accelerates. This practical application of the topics learned ensures that they would remember all the content, and push them to make more scientific connections in real world situations. You can find our explanations in the presentation below.
0 Comments
8/23/2020 0 Comments Water Cycle ActivityBy Sanjana KAMBHAMMETTU, Vishista Chittalooru, And Swara repala
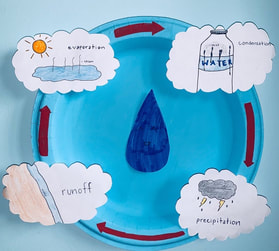
In this session, we will be learning about 4 stages of the water cycle by creating our own diagram using different art mediums. This activity shows the path that a droplet of water takes as it goes on a journey throughout the world. The recommended age group for this project is 4-10 years old, although all ages are welcome!
MATERIALS NEEDED:
- Paper Plate - Paper - Preferably Color Pencils/ Markers, but you can also use a pencil. - Scissors - Sharpie/ Marker - Tape
HOW TO
Step 1: Draw 4 clouds on a sheet of paper, big enough to demonstrate each stage inside of it. * In Steps 2-6, you can be as creative as you like! * Step 2: Draw a puddle of water and the sun, with the steam rising up on the first cloud to show evaporation. Step 3: Draw a water bottle with mist inside of it on the second cloud to show condensation. Step 4: Draw a stormy cloud inside the third cloud, with lighting and rain to show precipitation. Step 5: Draw a river going down a mountain on the last cloud to show runoff. Step 6: Color and cut out your beautiful clouds! Step 7: Tape the clouds onto the edges of the paper plate, right side up, in the four "corners." Step 8 (Optional): Draw and cut out a water droplet to tape to the middle of the paper plate. Step 9: Draw arrows going from one cloud to the next in a clockwise direction on the plate. Step 10: Share your knowledge about the water cycle to your friends and family!
THE LESSON
Throughout this class, we will be describing the process of the water cycle. The kids would learn the steps that a water droplet goes through by drawing and explaning the four stages- evaporation, condensation, precipitation, and runoff. This guided activity ensures that they understand and remember what they learn about the cycle of water and creativity and hands-on learning with their critical thinking. You can find our science explanations in the presentation below!
8/13/2020 0 Comments Straw AirplaneBy Swara Repala and Sanjana KAMBHAMMETTU
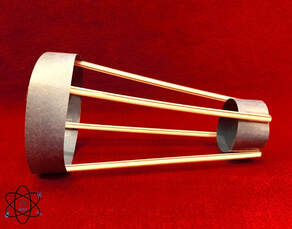
In this lesson, we will be explaining the basic forces of aerodynamics by creating a straw airplane. This project is an unconventional paper plane that will demonstrate the principles of lift, thrust, drag, and weight. As it is a more simple project and lesson, the recommended age group for this project is 4 to 7 years old, but all ages are welcome.
Materials Needed:
- 1 piece of paper (preferably construction paper)
- 4 drinking straws - ruler - pencil or pen - scissors - tape HOW TO
Step 1, cut the piece of paper vertically, an inch wide. The dimensions of this would be 1" by 8.5". Do this two times, leaving you with 2 strips of paper.
Step 2, take one strip of paper and cut in half. One half of this strip will be discarded. Step 3, take a piece of tape and attach the two sides of the strips of paper, forming circles. Do this with both strips of paper. Step 4, if your straws have it, cut off the adjustable part (the bendy part). You should now have four straight straws that don't bend. Step 5, tape the 4 straws inside your big circle. Make sure the straws are aligned with the end of your circle, meaning that they aren't sticking out. Step 6, tape the other end of the straws onto the outside of the small circle. Step 7, fly your airplane! The lesson
8/11/2020 0 Comments Skeletal System Hand ModelBy Sanjana KAMBHAMMETTU, Vishista Chittalooru, and Swara repala
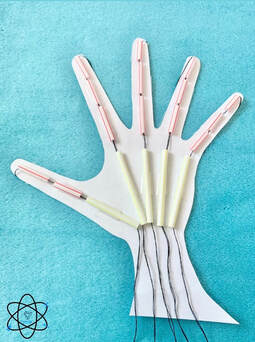
In this lesson, we will be learning about the inner workings of the skeletal and muscular systems by creating a paper model of a hand. The fingers will be bendable, and the movements will demonstrate how the bones and ligaments in our fingers move. The recommended age group for this project is 7-10, though all ages are welcome.
MATERIALS NEEDED:
- paper (preferably construction paper)
- a pencil - scissors - 4 to 5 plastic drinking straws (preferably 2 different colors- 2 of each) - tape - at least 30 inches of string - ruler HOW TO
Step 1, trace your hand onto the paper. *a larger size is better, so trace an adult hand, or draw it bigger if possible*
Step 2, cut the straws into 14 pieces that are around 1/2 inch long. You can also measure this by measuring the size of the finger, and dividing that into thirds. You can use this length in place of the 1/2 inch to get a more exact fit. Step 3, tape the straw pieces in a row on each finger. Step 4, cut and measure straw pieces to go from each finger to the base of the palm. Step 5, tape down the straw pieces going from each finger to the palm. All of your straw pieces should now be taped down. Step 6, cut 5 lengths of string long enough to run down from the tips of the fingers to slightly past the wrist. Step 7, tape a string to the backside of each finger tip. Pull the string to the front of the hand, and string it through the plastic straws on that finger, then through the straw running to the wrist. Tip: place the finger off the edge of a table to make it easier to string through. Step 8, now you can pull the strings to make the fingers bend open and closed! THE LESSON
As we are making this skeletal system diagram in our free live session, we will be describing the basic topics of bones, ligaments, tendons. This includes the functions of the skeletal system and muscular system. The kids would learn what each of these topics are, the basic ideas of each, and how it is shown in their hand and in their diagram. This project uses critical thinking skills and since it is a hands-on activity, kids are more likely to remember what they have learned and are able to make connections with information they already know, and what they will learn in the future. You can find our explanations in the presentation below! And, you can click on the video file below to watch the finished hand model in action, it can contract just like a real hand!
by: SANJANA KAMBHAMMETTUHistorically, science and art were taught as opposites as they are different subjects and have contrasting curriculums. However, over recent years, they have been used together to increase creativity and innovation in children's minds, as seen in STEAM, a growing educational method. We are using the differences in these areas in order to increase learning and understanding of the vast ideas by combining hands-on craft activities and science concepts. According to SpringerLink, a research collection of scientific, technological, and medical journals in the world, the divide between the topics has been decreasing in schools to be a "more authentic school science" with the help of arts and crafts that leads to many advancements. Neuroscientists say that thinking in science is actually stimulated by artistic activity and will encourage more critical thinking (Abd-El-Khalick). By engaging your children in these simple activities, you will be allowing them to expand on their knowledge of simple science concepts and increase activity in their sensory and motor-related areas of the brain (Arnholz). Along with that, combining these two ideals allows children to push past mental boundaries to allow debates that empower discovery and make a path for a new way of thinking.
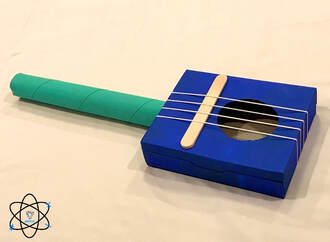
Works Cited: Arnholz, Jonathan. “Is Hands-On Learning Better?” Build Your Future, 14 May 2020, www.byf.org/news-item/is-hands-on-learning-better/ F. Abd-El-Khalick, NG. Lederman, et al. “The 'Great Divide': How the Arts Contribute to Science and Science Education.” Canadian Journal of Science, Mathematics and Technology Education, Springer International Publishing, 1 Jan. 1970, link.springer.com/article/10.1007/s42330-019-00057-7 by SANJANA KAMBHAMMETTU and vishista chittalooruThe hunt for a name for our organization was a very extensive and relentless process. After going through many names and words in an assortment of languages, we took a break, frustrated that we weren't finding anything. From there, we started scarmbling around the letter in the words art and science, which are the focus of our organization. And from there, the name 'Aence'- a combination of art and science- was crafted. After we had come up with a name, our next task was to create our logo. Our logo shows the atomic structure, with a paint palette in the center as a nucleus, and various art supplies along the rings, as electrons. This was how we blended the aspects of art and science into our logo.  8/8/2020 2 Comments Cardboard Guitarby SANJANA KAMBHAMMETTU, Vishista Chittalooru, And swara repala
In our first session, we will be learning how to make a DIY guitar, to learn about sound frequencies, vibrations, and waves in relation to music. This guitar can be "played" and is fully functioning in the way that pulling different combinations of strings produces different sounds. The recommended age group for this project is 5-10 years old, although all ages are welcome.
Materials Needed:
- small cardboard box
- 4 to 6 rubber bands *make sure these fit around the box* - 2 popsicle sticks or a pencil - tape - scissors - paper towel roll (optional) - glue (optional) How to
Step 1, cut a circle out from one side of the box. This circle doesn't need to be a specific size, small and big cutouts will both work.
Step 2, stretch out your rubber bands over the box. Step 3, place two popsicle sticks or a pencil under the rubber bands on one side of the box. Step 4, (optional) glue or tape the paper towel roll onto the top of the box. Step 5, play your guitar till your heart's content! The Lesson
Throughout the process of making this guitar in our free live session, we will be describing the basics topics of frequency, vibrations, and waves. The kids would learn what each of these topics are, the basic ideas of each, and how they relate to music, and more specifically, their guitar. This practical application ensures that they would remember what they've learned, and push them to combine creativity with their critical thinking. You can find our explanations in the presentation below!
8/8/2020 1 Comment Welcome to AenceHi everyone, welcome to our blog! This section will be a way for us to communicate, along with our newsletter (sign up below). We will be using this blog for new updates, information or research, craft explanations, and activity recaps from our sessions. Please sign up for our upcoming events below and share with your friends!
|
|||||||||||||||