|
10/27/2020 0 Comments Projector ActivityBY SANJANA KAMBHAMMETTU AND SWARA REPALA
In this lesson, we will be creating a projection out of recyclable materials in order to comprehend the concepts of the basics behind optics, such as how a wave moves, how light travels, and what lenses are. These important ideas are combined to make the craft, which, with the use of a flashlight, will display the picture your child has drawn onto the wall. We reccomend this activity for kids between the ages of 4 and 10, however, all ages are welcome!
MATERIALS NEEDED:
- A paper towel roll (any size)
- Clear plastic wrap OR ziplock bag - Rubber bands/hair tie/tape - Scissors - A marker (preferably a dry erase marker) - Small flashlight or phone light - Damp paper towel or wipe to wash it off, making it easy to reuse! - Optional: Coloring utensils HOW TO
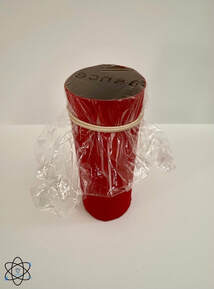
Step 1: Cut a square from your clear plastic wrap or ziplock bag that is bigger than the hole in your paper towel roll. This cut out will act as your projector screen.
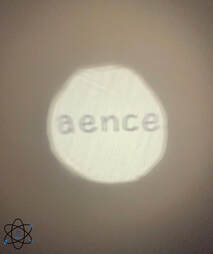
Step 2: Take your marker and write or draw whatever image you would like to see projected. Step 3: Flip the screen, so the side with the lettering is facing you. This is important if you are using wording or drawing something that is not symmetrical, such as the word aence, so that it will not be backwards. Step 4: Take a rubber band, hair tie, or tape and attach the projector screen down to the paper towel roll firmly. Optional Step: You can decorate the outside of your paper towel roll any way that you would like! Step 5: Shine a flashlight or phone light through the other side of the paper towel roll. The letters or drawing you have created will be displayed on the wall! Tip: Switch off all the lights in the room for a better and clearer view! THE LESSON
During this session, we will be exploring topics related to basic physics, including a wave and its parts, light and the color spectrum, along with lenses and their specific types. This explanation, along with the hands-on interpretation of the projection of light and how our eyes interpret it, will form connections between the ideas in children's minds, and lead them to a better understanding of the topic at hand. You can find our lesson in the slideshow below!
0 Comments
10/25/2020 0 Comments Hello everyone! Hello everyone! To start off this blog post, here is a riddle. How do you fix a flat pumpkin? Put your answers in the comments, and we will shout out the people who get it right! No cheating!
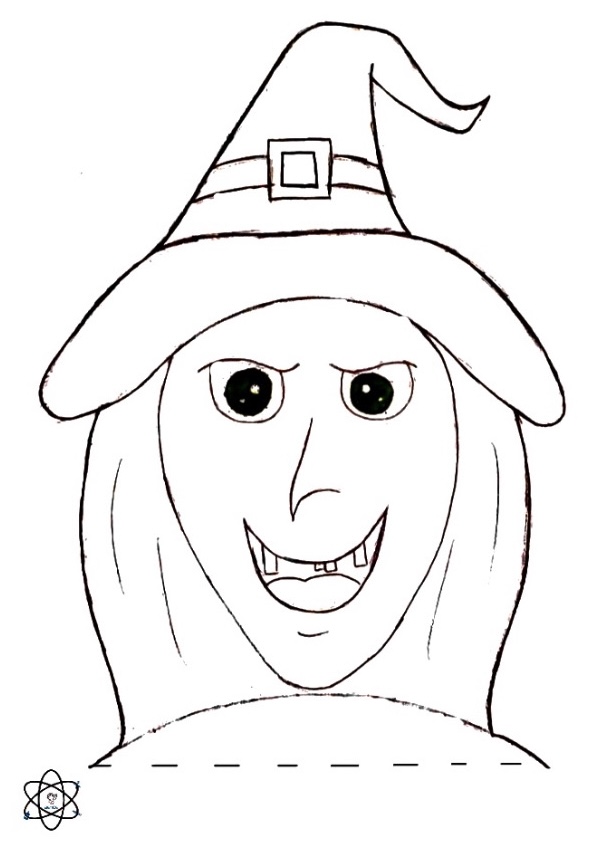
Again, hello everyone. We hope you all are doing well! During this unprecedented time, it is understandable to be going a bit crazy. We are all stuck inside, and being confined to four walls is a bit constricting. But there are many things you can do to have fun! Most noticeably, Halloween is coming up in just a few days! Personally, it is something that I am most excited about. And, though Halloween might look different this year due to COVID-19 restrictions, it does not mean you cannot dress up and eat candy! Along with Halloween festivities, you can also carve pumpkins, as I recently did, and had a lot of fun! His name is Henry, and he sits in front of our house. My only warning about pumpkin carving is, be prepared to get messy! Lastly, an activity that you will have no problem doing is: admiring the beauty in the outdoors. Go outside and enjoy the sights and smells of the season! Whether it be to put your pumpkin in front of your home, or just stare at the gorgeous sky, be sure to take a second to enjoy what nature has to offer. The clouds that make amazing shapes. The sunset that looks like a painting. And the leaves that look like gold. It is amazing how beautiful nature is, if you simply take the time to look. There is art all around us! In the skies and the leaves. Even in the bushes and the trees. It is so easy to get caught up in school, work, and all of the other things you might have going on. And trust me, the struggle to balance it all is real and takes a lot of hard work. But, as I end this quick check in, I implore you, go outside. Enjoy the sights and smells of the season. Have fun with your family. And most importantly, take a second to see the art in your world. Cheers to a great fall season! 10/18/2020 0 Comments Witchcraft ActivityBY SWARA REPALA AND SANJANA KAMBHAMMETTU
In this week's halloween themed session, we will be learning about physical changes and chemical reactions, along with physical and chemical properties. This craft is an interactive game, where the kids can throw balls into the witch's potion! The recommended age group for this activity is 4 to 10 years old, however, all ages are welcome!
MATERIALS NEEDED:
- 1 paper plate
- 2 or 3 pieces of paper - Scissors - Tape - Optional: Coloring materials, Glue. How to
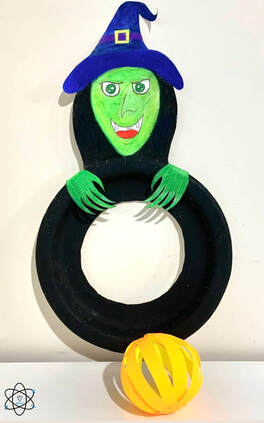
The Witch:
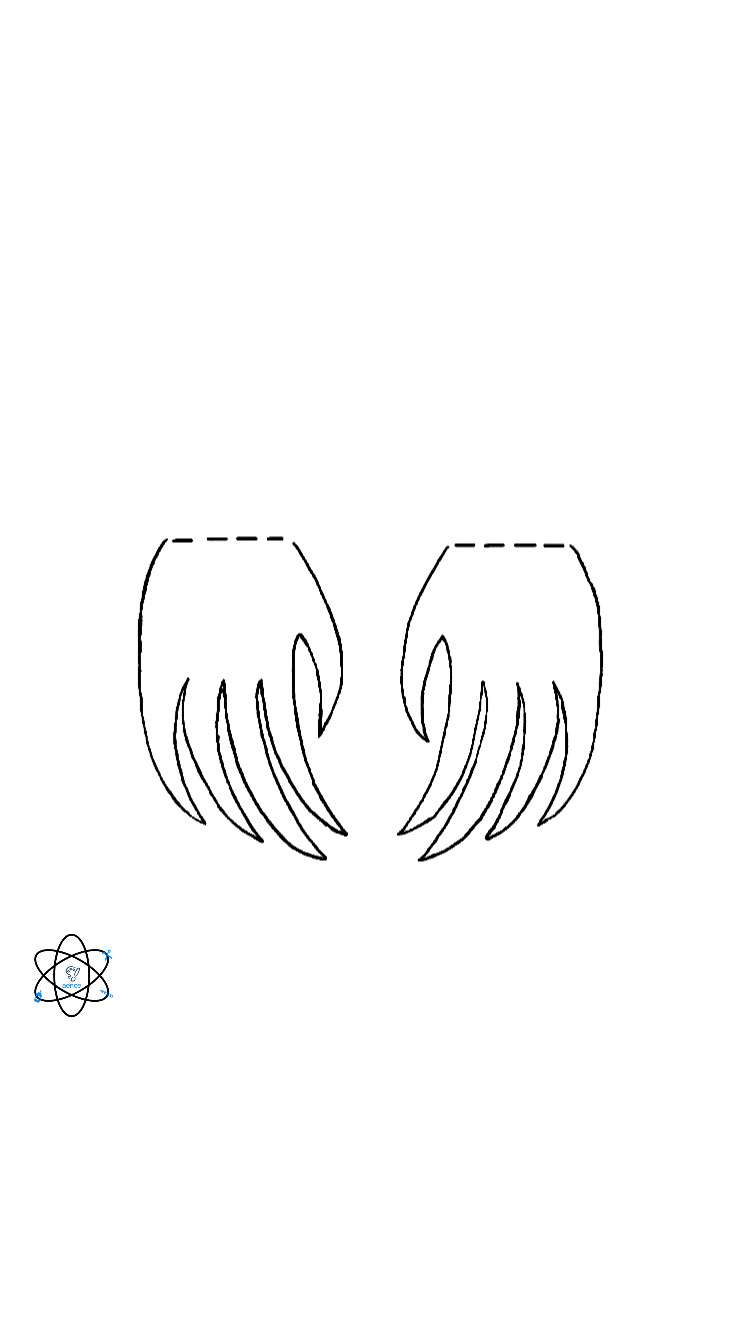
Step 1: Draw a witch, along with her hat, and make sure to add a curve at the bottom with space to attach your paper plate. You can print out our free template, which can be found below, or use it as a reference to draw your own! Step 2: Take your paper plate, and make a hole in it using scissors. This hole can be as big or as small as you like, although, be sure to make sure your balls will fit when thrown through! Step 3: Attach your paper plate, or potion, to your witch using tape. Optional: If you would like, you can draw and cut two hands, and tape or glue them to the potion. For this par, you can print out our free template, which can be found below, or use it as a reference to draw your own! Step 4: Hang your witch by its hat to a doorway (or the edge of a table) to play your game! Balls: Step 1: Cut 4 to 6 strips of paper that are about 0.5 inches by 11 inches in size. Step 2: Place two strips in the shape of an X, and keep adding strips in the same way, to make a snowflake shape, gluing them together as you go. The centers of your strips should always be in the middle of your shape. Step 3: Make sure that you have glued all of the strips in the middle, so your shape is attached firmly in the middle. Step 4: Bring up all of the ends of the strips, and tape or glue the tips together, the same way you did the bottom, by connecting opposite sides together. Connect and secure the ends so that they make a sphere-like shape. Step 5: Repeat these steps to make as many balls as you would like, then throw them into the potion and play your new game! The Lesson
During this session, we will be learning about physical changes and chemical reactions. We will be connecting these reactions to the witch’s potion, in which balls will be thrown into as part of the game! This creative connection and repeated enforcement while playing the game multiple times will be instrumental in insuring that all information is retained and fully understood. You can find our science lesson, craft explanations, and templates in the presentation below.
10/13/2020 0 Comments Changing Leaves CraftVishista Chittalooru and swara Repala
In this lesson, we will be learning about the changing colors of leaves during the fall, and why it occurs. The craft is interactive, allowing the kids to turn it and see the shift in leaves colors. Our recommended age group for this activity is 4-10 years old, however, all ages are welcome!
Materials needed
- 2 plates
- 1 paperclip - Pencil - Scissors - Coloring supplies (markers or paint recommended) * if using paint, a paintbrush is also needed! How to
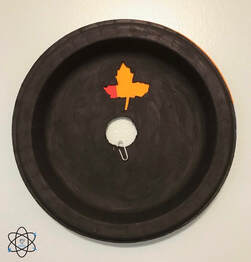
Step 1: Divide a plate into fourths with your pencil.
Step 2: With your coloring supplies, color each piece of the plate a color coordinating with the season. For example, we used red, green, yellow, and orange. Step 3: On the other plate, draw a leaf with your pencil. Step 4: Cut out the leaf you have drawn. You should now have a leaf shaped cut out in your plate. Step 5: In the middle of both of the plates, cut a hole at least about the size of a quarter. Step 6: Put the plate that has the leaf cut out over the colored plate, and attach the paperclip through the hole you cut out. Step 7: Turn the top plate to see the leaves change colors! The lesson
In this lesson, we will be learning about the leaves changing color during the fall, and why it occurs. We will be focusing on scientific processes while connecting it to our lives, explaining how we can observe this phenomenon in our own backyards! The hands on nature of this activity ensures that the kids fully comprehend, and retain all the content they have learned, while gaining the creative and critical thinking skills they will need to make more scientific connections! You can find our science lesson and craft explanations in the presentation below.
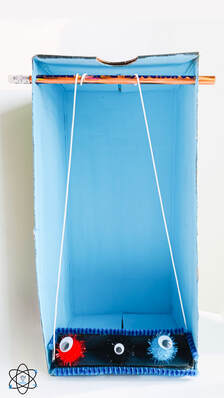
10/5/2020 7 Comments Elevator Energy ActivityBy Sanjana Kambhamettu and Vishista chittalooru
In this lesson, we will be learning how to make a functioning elevator in order to learn about energy, how it works, and the different types of it. Our recommended age group for this project is 7-10 years old, however, all ages are welcome!
MATERIALS NEEDED:
- A small-medium cardboard box, like a shoe box (the width should be the length of a wooden pencil)
- Extra Cardboard - Standard wooden pencil - Tape - Yarn/Medium size thread(not thin) - Scissors - Pencil for tracing - Optional: Coloring Supplies HOW TO
Step 1: Cut the lid off of your box, if your box has one.
Step 2: Mark two holes the width of your pencil on both sides of your upright box, about an inch from the top. Step 3: Cut out the holes and insert your pencil through it. Step 4: Cut strong string that is about double the length of your box. Estimated measurements of the string, based on a shoe box: 30 inches long. Step 5: Wrap the string around your pencil and secure it tightly with tape, with both ends hanging down. We will come back to this later. Step 6: Measure the width of the shorter side of your box, and add 2 inches. Now, cut a strip of cardboard, either from another sheet or the discarded lid. The dimensions of this strip should be about 3 inches by the length that you calculated earlier. Estimated measurements based on a shoe box: 3” by 6” Step 7: Mark 1” from both sides on the strip with a pencil, and fold the flaps along that line. This is your elevator. Step 8: Place the strip of cardboard on the base of the box, flaps facing up. Step 9: Revisit the string that we had hung from the pencil, and tape it securely to the sides of your makeshift elevator. Step 10: Slowly twist your pencil to make your elevator move up and down. You now have a working elevator! THE LESSON
In this session, we will be exploring the concept of energy. This includes learning about the law of conservation of energy, which is an important principle in science, along with the the 2 main categories of energy, and the subsections. During this, we will be creating a 3-D model elevator to demonstrate the power of electricity, which takes energy, in our world today. This connection between the concepts and the real life application will allow for students to deepen their critical thinking skills and allow for more in depth realizations. You can find the science explanations and a picture of the craft below!
|
||||||||||||||||||||
