|
12/6/2020 1 Comment Sleep Cycle DiagramBy Sanjana Kambhammettu
We will be exploring the topic of sleep and its importance in this Winter Camp activity. Through the diagram that we will be creating, it can be seen how our minds travel through the various stages of sleep, and what is occurring in our bodies at that time. We will also learn about our internal clocks, or Circadian rhythms, and sleep disorders one might attain if they do not get enough rest. And, if you have ever wondered how dreams occur, or why you may sometimes feel like you have not fully slept through the night, come to our session to find out! This lesson is aimed towards children between the ages of 4 and 10, however, anyone is welcome to join us!
Materials Needed:
- 2 sheets of construction paper/card stock
- 1 sheet of printer paper - Scissors - Regular tape/double-sided tape - Glue stick - Penny/quarter/small 3-dimensional object - Marker/sharpie/pencil - Optional: Coloring Utensils How To
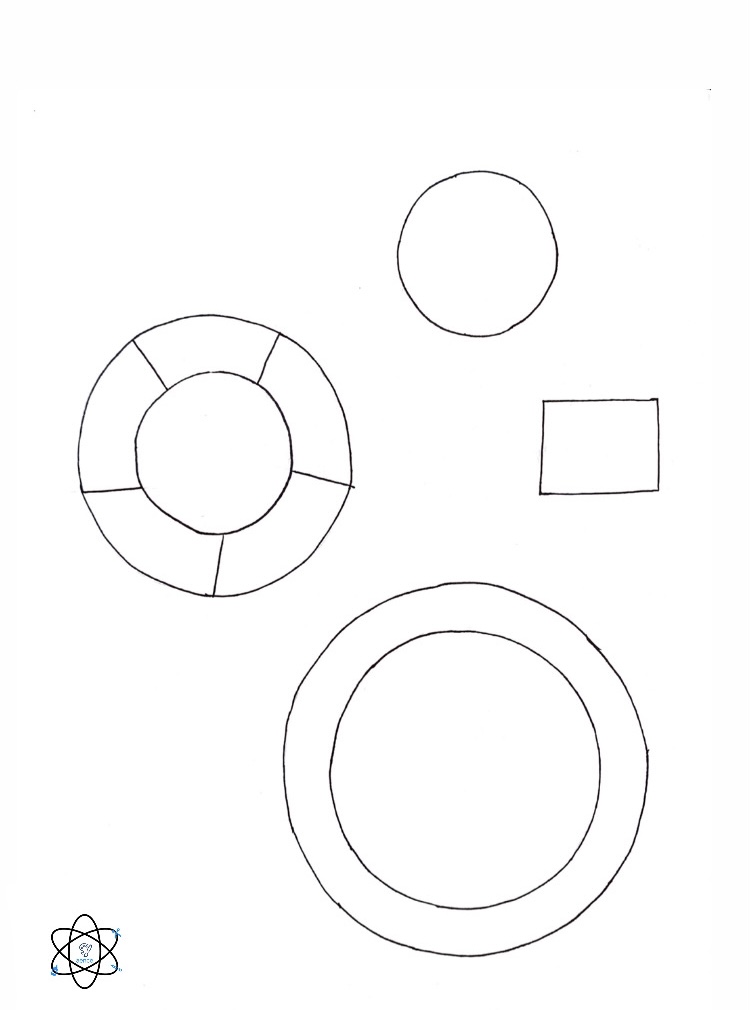
Step 1: On your sheet of printer paper, draw and cut out 3 circles that will fit inside one another. You can use the template below as reference or to print and cut for your own diagram.
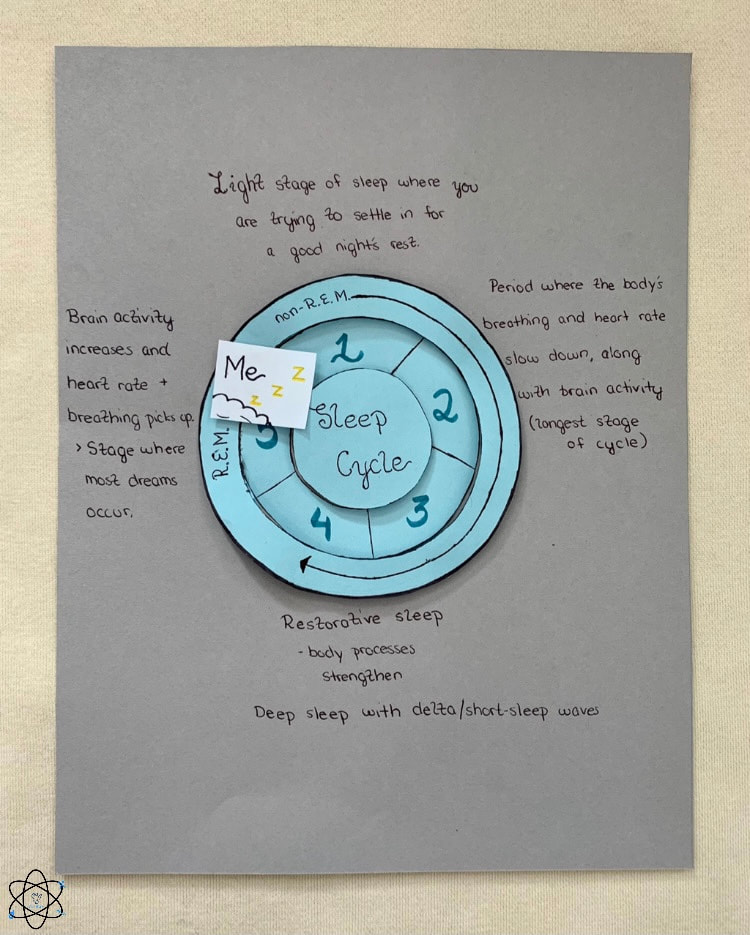
Step 2: Glue the middle sized circle down on your sheet of construction paper. Step 3: Label the the sections on that circle from 1-5, going clockwise. Step 4: In the general area of the sections, label 1-4 as non-REM and 5 as REM sleep on the edge of the biggest circle. You can add an arrow to connect these if you would like. Step 5: Take your double sided tape of folded strips of paper (about 1 inch wide and 3 inches long; fold in zig zag pattern) and tape the on the back rim of the largest circle. Do this as many times as you would like, making sure all sides will stay in place, and elevate the circle (for reference, the template required a minimum of 5 strips to hold it up securely). Step 6: Align the circles and tape all the sides down, making sure the biggest circle is raised. Step 7: Place your coin or small 3-dimensional object on the inside of the lifted platform. Step 8: Label your smallest circle "sleep cycle" or something similar. Step 9: Add double sided tape or folded strip(s) of paper on the back of the smallest circle, and align it on the inside. Make sure it is is risen above the coin. Step 10: Cut out a square, rectangle, or any shape that will represent you. Step 11: Tape this onto the coin or object, and place the corners above the circles. Step 12: The outside of the circle slider diagram will be your information section. On your infographic, note down things about each sleep stage around all your circles. You can add as much or as little detail as you would like to remember and distinguish each stage of the sleep cycle! You can use the picture below as a guide of what to write down. Step 13: Now, you can watch yourself sliding through each of the sleep stages and the sleep cycle. Sweet dreams! The Lesson
In this session, we will be exploring sleep related topics and creating an interactive infographic that will teach about the different stages of sleep. This activity will ensure visual connections, as every time the children look at the diagram, they will observe the shifting of the cycle. And, reading the description of each part will help them recollect the details about the body's natural clocks and the reasoning behind their dreams. This fascinating information will also help them remember how important it is to get a good nights rest. You can find our detailed science presentaion and our free, printable craft template down below!
1 Comment
Nice blog!! Sleeping is a good way for those who don't get enough sleep at night to catch up, according to sleep specialists. Nidra nutrition gummies might help you avoid stress and obtain enough sleep. They do warn, however, that napping during the day may aggravate an insomniac's trouble sleeping at night. - Nidra Nutrition Leave a Reply. |
|||||
